Welcome to our hands-on review of the Creality CR-6 SE.
By now you likely know of the Creality brand of 3D printers. You’ve likely heard of the Ender 3 V2 but are wondering what’s the best printer you can get for a good price.
Well, I bought a Creality CR-6 SE to help you find out if it’s the best value you can get.
Ok, I actually bought four.
There are a million reviews online so we’re going to do something different for you.
We put the Creality CR-6 SE through 6 measurable torture tests to show you:
- how easy it is to print with it,
- how fast it can print,
- how loud it is,
- and what quality you should expect.
We’ll also review what’s really important on the CR-6 SE:
- What we love, like, and hate
- Stress test results and benchmarks (what the printer can do VS others)
- Print ease – will you work ON your 3D printer or will your 3D printer work for you?
- Print Speed – how fast it can really go
- Print Quality
- Maximum overhangs
- Maximum bridging
- Loudness
- Standout features and specs
- Debunking manufacturer’s claims
- A comprehensive feature review
- All the printer specs
- Alternative printers to consider
But why should you trust me?
I’m a mechanical engineer who choose his university because it had a 3D printer (back in 2004). I’ve been 3D printing for 4 years now and buy (or work with people who own) every printer I review.
I personally own four Creality CR-6 SEs and have been printing with them for over a month as of writing this.
While I do make a commission if you buy a 3D printer through my links, this is my side gig. Thankfully, I’m blessed to make enough money at my job that the $6 I’d make from your purchase isn’t life-changing money.
So I’d rather you pick the right printer for your needs, rather than the one that gets me the most commission.
Buy a Creality Cr-6 SE
So let’s get started…
Creality CR-6 SE, the bottom line
7.7/10
The CR-6 SE is a wonderful, wonderful 3D printer for beginners.
Creality has a knack for making printers that you spend at least as much time tinkering on the printer as you do actually printing. But the CR-6 has been chugging along steadily creating everything from articulated sharks to unbelievable overhang tests.
However, you really will need to flash the firmware to the CR-6 SE Community Edition firmware. Don’t worry, it took me ~8 minutes following a YouTube video.
You should buy it if
You want Prusa-level ease of 3D printing for half the price.
Avoid it if
You plan on printing a LOT of flexible filaments. The Bowden extruder on this printer just won’t stack up to a direct drive.
Garrett’s hot take
I really, really like this printer. With a quick firmware update and extruder upgrade this will quickly become your go-to workhorse printer.
What we Loved
The Creality CR-6 SE is the first one that stacked up well against my Prusa i3 MK3S+ in terms of ease of printing, automatic bed leveling, and absurdly impressive overhangs.
What we Like
The touch screen is nice but not as big of a deal as others make it.
What we Hate
- The stock firmware is garbage. Use the CR-6 SE Community Edition Firmware. It’s great.
- The stock extruder is a fancy design but works like a dumpster fire. Replace it.
Overall, not lots to hate about this printer.
Stress test Score overview
We independently test all 3D printers. For details, explanations, and graphs see the stress test section.
Tested Max Speed
56mm/s
(Very slow)
Tested max OVerhang
20°
(Bananas impressive)
Tested max Bridging
125mm
(Very impressive)
tested Loudness
Idle: 35db
Printing: 50dB
(Fine to use in your bedroom overnight)
tested Nozzle heat time to 200°C
1m25s
(Impressive)
tested bed HEAT TIME to 50°C
1m33s
(Impressive)
Creality Cr-6 SE Important Specs
| Type | Cartesian / i3 / Bedslinger |
| Price | $429 |
| Bed leveling | Automatic mesh bed leveling |
| Heated bed | Yes |
| Enclosed chamber? | None |
| Hotend build | PTFE lined |
| Max printing temp | 255°C * |
| Extruder type | Bowden |
| Filament Runout Sensor | Yes |
| Power Failure Print resume | Yes |
| Build Volume (LxWxH in mm) | 235x235x250 |
| Z axis | Dual Z |
| Amount of assembly required | Little (under 3 hours) |
| Community size (FB) | 12,000 |
| Community size (Reddit) | 3,500 |
Stress tests
Bluntly, I haven’t found “tests” of real prints to be very convincing. It’s both unscientific and heavily influenced by lighting.
So I put this printer through:
- a test to determine max speed with no underextrusion,
- two tests for quality (bridging and max overhangs),
- two tests for its loudness,
- two tests for print adhesion, and
- timed how long it took to heat the bed and nozzle to 50° and 200°.
Max Speed test: the 100% extrusion method
Summary:
At 0% under extrusion, the Creality CR-6 SE max print speed was a not-impressive 55mm/s (with standard 0.4mm nozzle at 0.2mm height) at a volumetric flow rate of only 5 mm^3/s.
Test methodology:
Originally I planned on following this volumetric flow rate test method on Bob’s project notebook.
However, I’ve found that Creality’s mediocrely-machined extruder gears will often slip before the extruder starts clicking. So instead I used a “mark and measure” method to measure both the volumetric flow rate and any underextrusion, similar to this one.
To test the Creality CR-6 SE print speed, we:
- Calibrated the printer’s eSteps (the CR-6 has a built-in tool to do this easily).
- Grabbed our and set the hotend to 220°C
- Used to measure 80mm from the extruder
- Sent
a G1 E80 F{Speed}code through our Octoprint terminal - Measured weight in hundredths of a gram and the actual length of filament extruded.
- Graphed it
Results:
I was surprisingly underwhelmed by this extrusion test. At 100% extrusion, the CR-6 SE only was able to push ~5mm^3/s. At a standard print size of a 0.4mm nozzle (0.45 mm line width) at 0.2 line height, that’s only 55.68mm/s.
If you’re ok with anything > 90% extrusion we found the CR-6 SE to survive until 11mm^3/s (122.5mm/s linear speed at standard 0.4mm width 0.2mm height.)
| Extrusion speed (mm/min) | Planned extrusion (mm) | Extruded (g) | Measured extrusion (mm) | Volumetric flow rate | % Extrusion | Max Speed (standard setup) (mm/s) |
|---|---|---|---|---|---|---|
| 100 | 80 | 0.28 | 80 mm | 4 mm^3/s | 100% | 44.54 mm/s |
| 125 | 80 | 0.28 | 80 mm | 5 mm^3/s | 100% | 55.68 mm/s |
| 150 | 80 | 0.28 | 78 mm | 6 mm^3/s | 98% | 66.81 mm/s |
| 175 | 80 | 0.25 | 77 mm | 7 mm^3/s | 96% | 77.95 mm/s |
| 200 | 80 | 0.22 | 75 mm | 8 mm^3/s | 94% | 89.08 mm/s |
| 225 | 80 | 0.22 | 74 mm | 9 mm^3/s | 93% | 100.22 mm/s |
| 250 | 80 | 0.21 | 73 mm | 10 mm^3/s | 91% | 111.36 mm/s |
| 275 | 80 | 0.22 | 74 mm | 11 mm^3/s | 93% | 122.49 mm/s |
| 300 | 80 | 0.18 | 55 mm | 12 mm^3/s | 69% | 133.63 mm/s |
| 400 | 80 | 0.12 | 40 mm | 16 mm^3/s | 50% | 178.17 mm/s |
Our take:
I was quite underwhelmed by this test. My guess is the extruder is the main problem here as it looks interesting but is not the most functional extruder.
These numbers are so low that I’m going to retest this on another printer just to be sure.
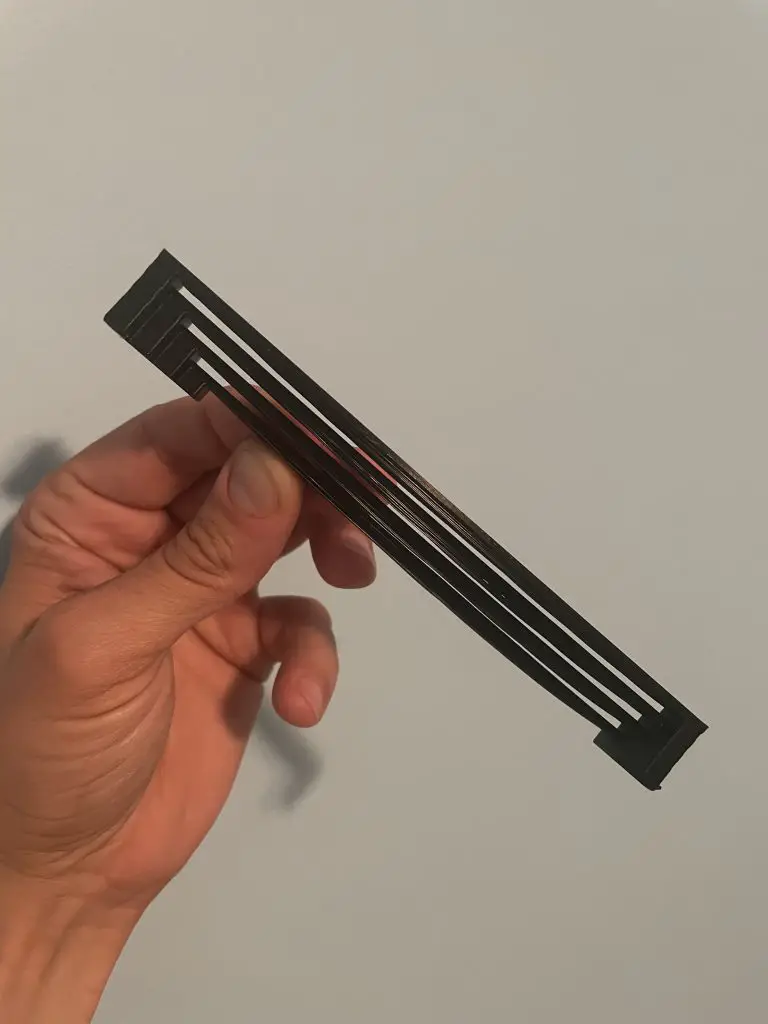
CR-6 SE Max Overhang test: how much is too much?
Summary: The Creality CR-6 SE max overhang was perfect at an incredibly impressive 20° (and nearly perfect at 15°, the maximum overhang of our test).
Why overhangs matter:
Most models you print will have some overhang. Most printers can handle 45° fairly well (lower is better). With a lower overhang angle, you’ll get higher quality prints and less need for supports. Reducing cost and post-processing time.
Overhang test methodology:
To test across printers we allowed only a temperature tower for calibration and otherwise used stock settings on Prusa Slicer.
To test the max unsupported overhang and max supported (bridged) overhang, we used this model on Thingiverse from 45° down to 15°.
We then chose the overhang that was near-perfect for both supported and unsupported overhangs.
Results: Max Overhangs for the Creality CR-6 SE:
I was absolutely stunned on this one.
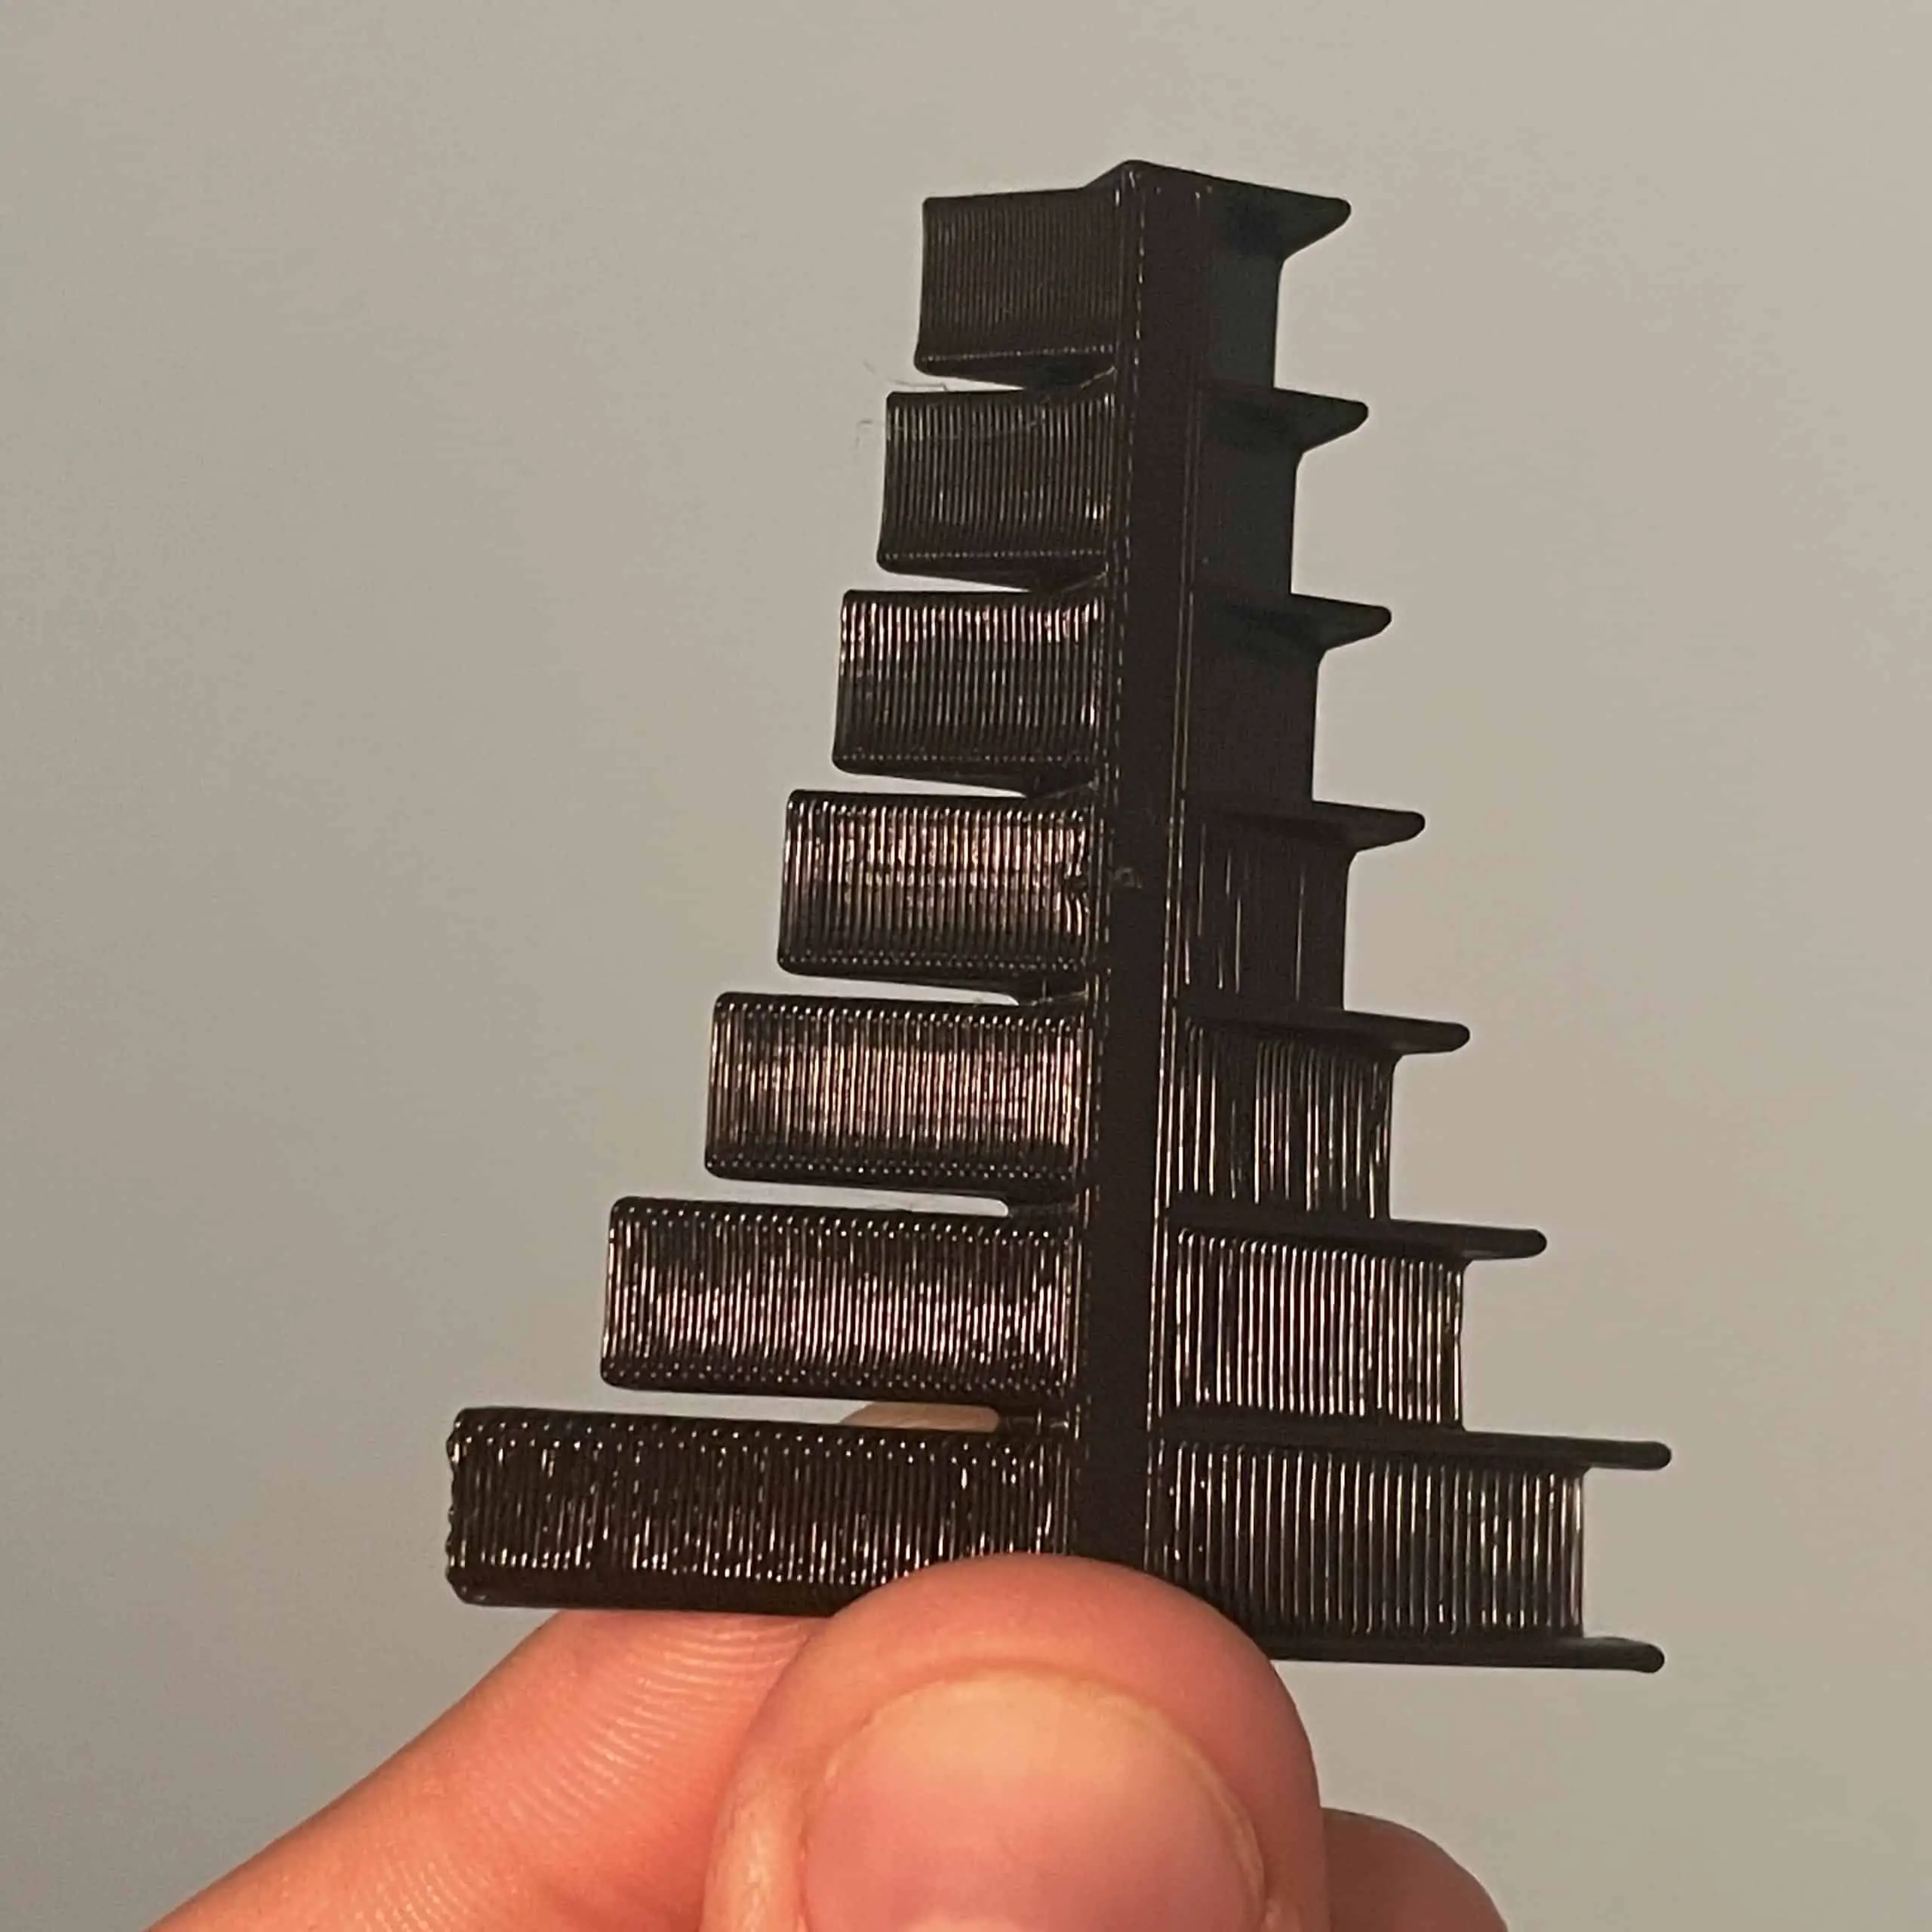
Both unsupported and supported overhangs were near perfection at a whopping 20° overhang (and were almost perfect at the 15° limit of our test).
Our take: The CR-6’s overhang game was stunning. My (twice the price) Prusa MK3S+ can’t even handle overhangs like that. You can pretty much forget about needing supports.
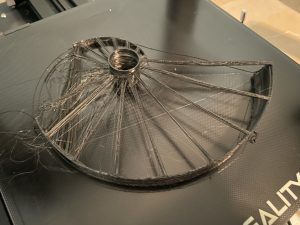
CR-6 SE Max Bridging test: how far is too far
Summary: The Creality CR-6 SE was able to print clean bridges at a whopping 125mm with only a temperature tower for calibrations.
Why bridging matters:
Bridge length is a great proxy for the part cooling power of your 3D printer. Longer, cleaner bridges will mean less droopiness and post-processing cleanup.
Bridging test methodology:
To stay consistent between printers we print one temperature tower to pick the best print temperature for our filament. Otherwise, we use stock Prusa Slicer settings for a printer.
Could you get longer bridges with a few hours of tuning? Absolutely. But our goal is to show what an inexperienced operator can do with minimal setup time.
To test max bridging we first used this bridging test on Thingiverse. For printers that can bridge at > 100mm, we created our own, massive bridging STLs with 20mm gaps between sizes.
Once we found the max bridge length we printed a second round with 4 bridges at a 5 mm difference in length to find the best bridging within +/- 2.5mm.
Results, max bridging for a stock Creality CR 6 SE:
Round 1: Thingiverse print
Our bridging test started with some struggles.
Our first test print was a complete failure. Nothing stuck to the bed and we ended up with a jumbled mess.

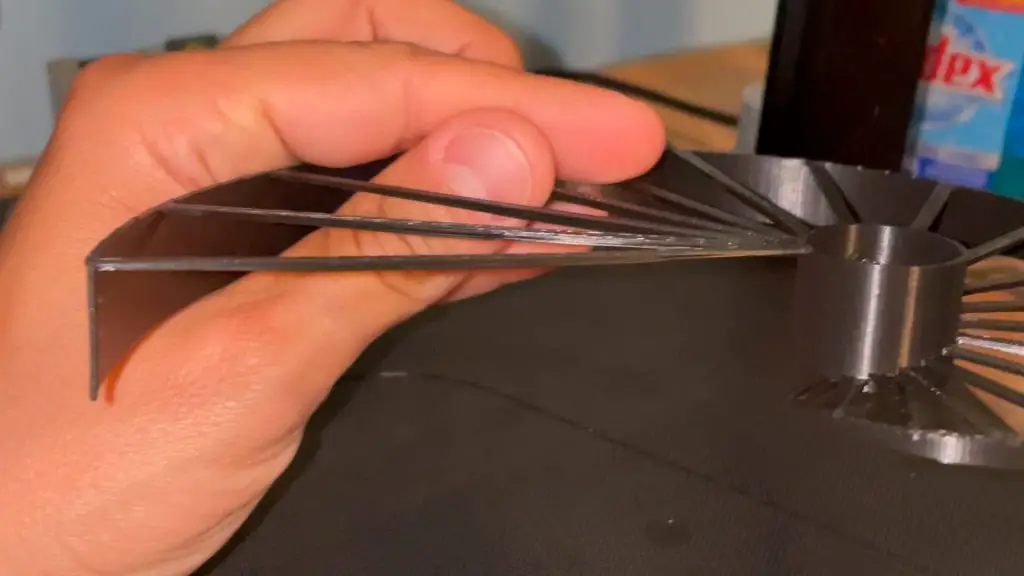
Round 2 (3, and 4): let’s try a gluestick.
Nope. Total mess.
It wasn’t the printer’s fault, though. I was ignoring all the popping caused by wet PLA filament. I also didn’t run a temperature tower.
So the PLA went into my dryer for the night, printed a temperature tower finding I was off by 15°C, and the next test was perfect.
Actually, it was too perfect. Even at 100mm, the CR-6 SE had near perfect bridges.
Round 2, super bridging.
Round 2 started at 100mm with each bridge increasing in increments of 20mm.
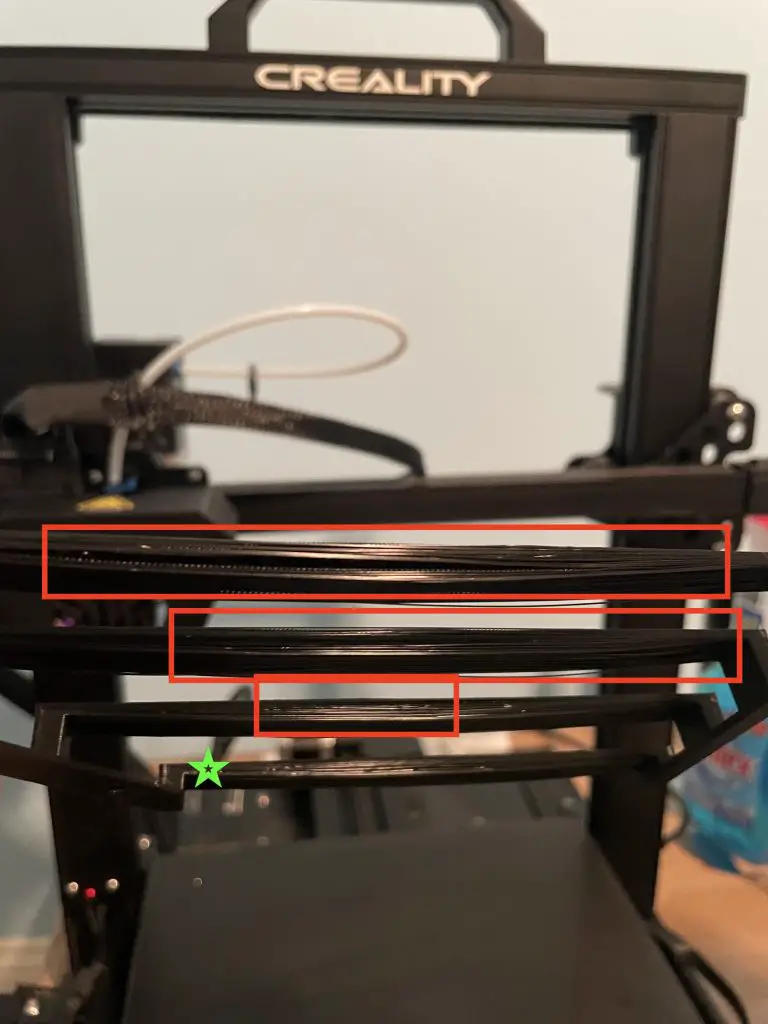
Layer separation was just starting at 100mm and was still perfectly usable at 120mm. At both 140 mm and 160mm I could bend the bridge with ease and see nearly every layer separate.
We’ll call it somewhere between 120mm and 140mm.
Round 3, being precise on the maximum bridging:
For our third round, I printed four bridges at 120mm, 125mm, 130mm, and 135mm.
After about 130mm there was just too much layer separation and too much droopiness to call it good. So we’ll call it 125mm… which is bananas.
Our take: The CR 6 SE did exceedingly well, producing very long bridges (up to 125mm) with only a single temperature tower for calibration.
How loud is the Creality CR-6 SE
At idle
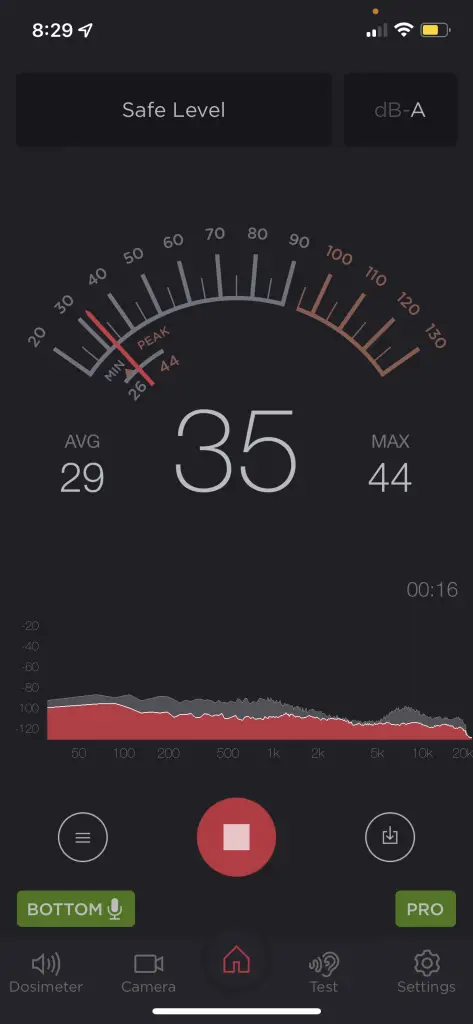
Of my two best-operating CR-6s, one is loud at idle and the other is quite quiet (shown above). Creality uses cheap fans to cool the motherboard (actually, all the fans are cheap) and I think I got a bad one.
However, my CR-6 with a properly working motherboard fan was a quiet 35dB at idle – louder than a whisper but quieter than your average suburb at night.
All of this noise was from the motherboard fan. This was much better than the Creality Ender 3 V2.
Not as quiet as my Prusa i3 MK3S+ while idling but managable. I wouldn’t keep it on in my bedroom.
While printing
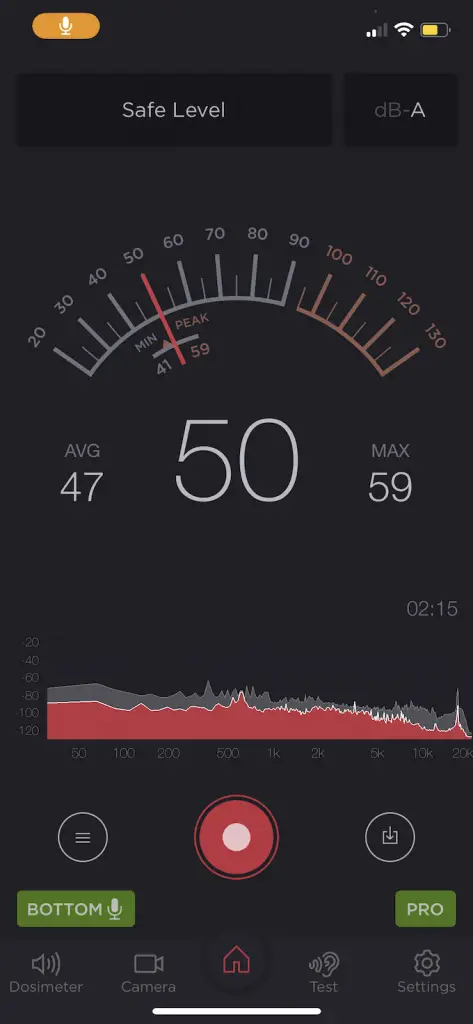
While printing the CR-6 SE had a peak loudness of 59dB – about as loud as a normal conversation. This is not too loud and has none of the “singing” of the old 8 Bit motherboards.
Overall, not too loud. Like usual – the fans on a Creality printer are the loudest part but thankfully are the cheapest and fastest to replace.
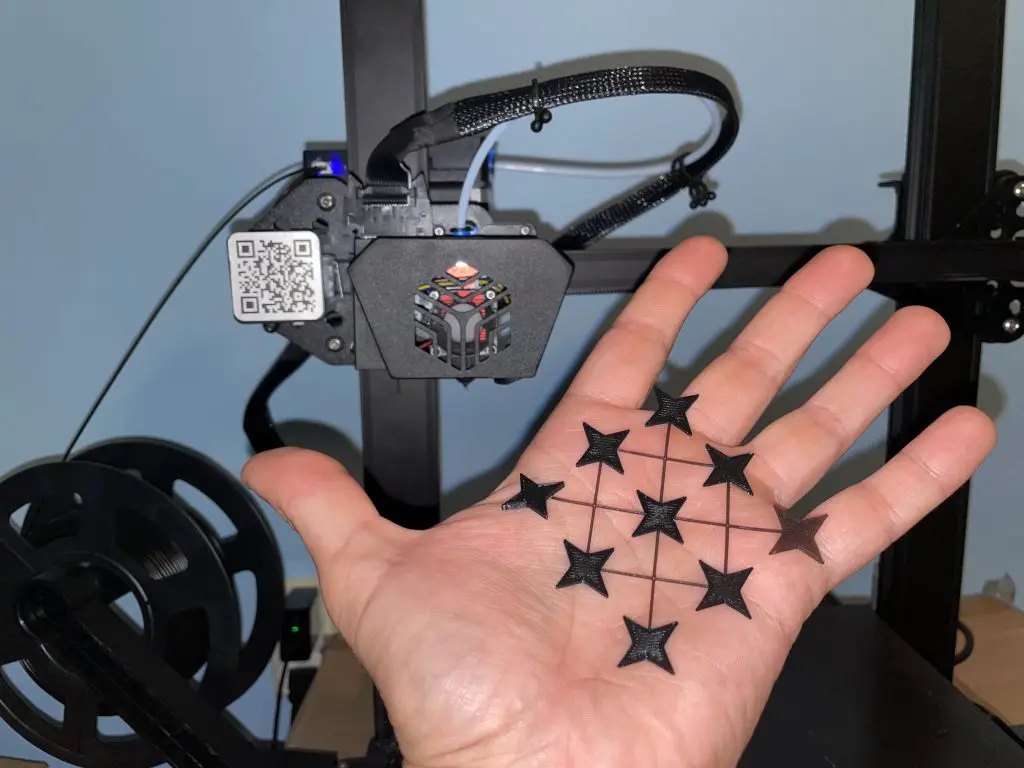
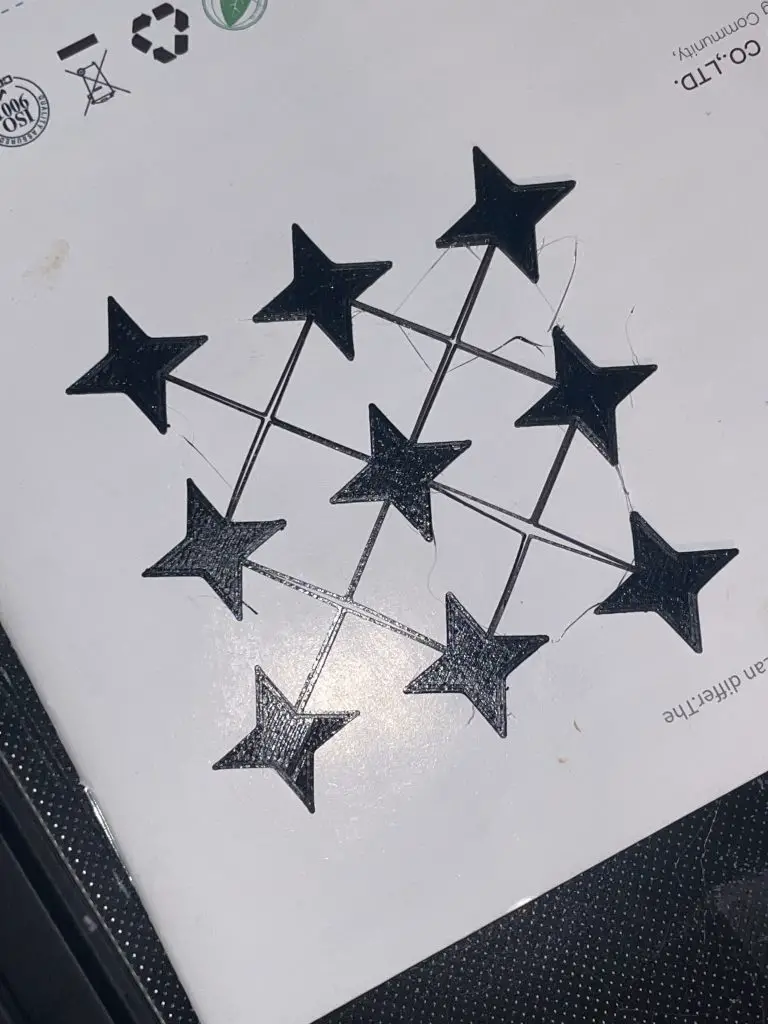
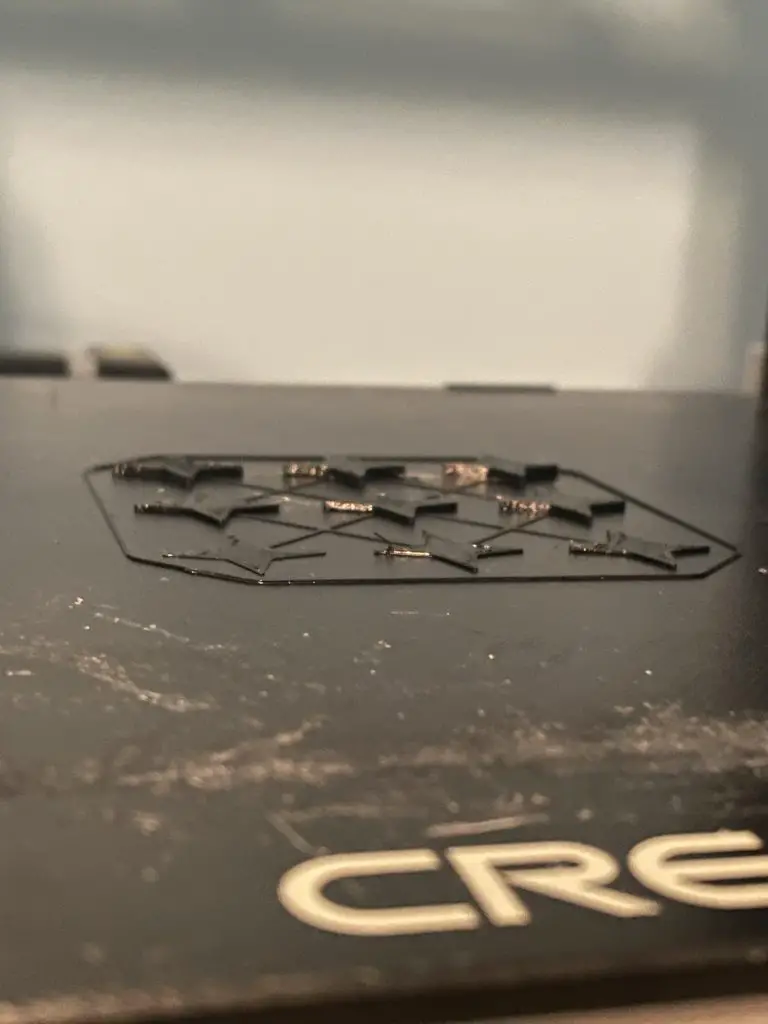
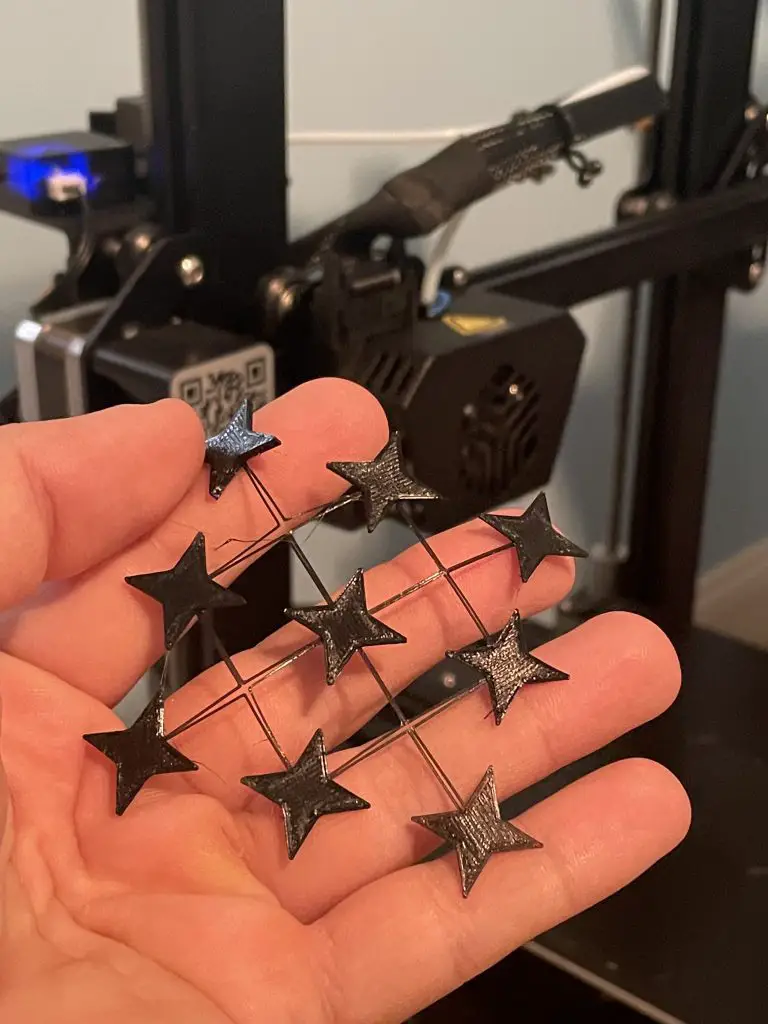
How well does filament stick to the Creality CR-6 SE Max glass bed
Summary:
Unlike my Ender 3 V2, I’ve had literally zero issues getting PLA to stick to this bed. Also, once cooled it releases with nearly no force. Call me a glass bed convert.
Test methodology:
PLA and PETG are two of the most common filaments. For both PLA and PETG we printed this Bed Adhesion Test by TekMason (free on Thingiverse).
Related post: What’s the difference between PLA VS PETG
For tuning, we printed a temperature tower but otherwise used stock Prusa Slicer settings.
For printers with automatic mesh bed leveling (like the CR-6 SE) we run a custom G28 “autolevel” gcode before each print.
We also used hairspray to help with adhesion but did not use other stick-enhancing items.
Results:
The CR-6 SE had perfect bed adhesion for both PLA and PETG. There was zero warping for any of the tests. Perhaps we need a more challenging test…
PLA adhesion for the Creality CR-6 SE
PETG had similar effects, with no warping and easy adhesion. I did find that layer lines had a little more trouble sticking, despite getting a good “squish”.
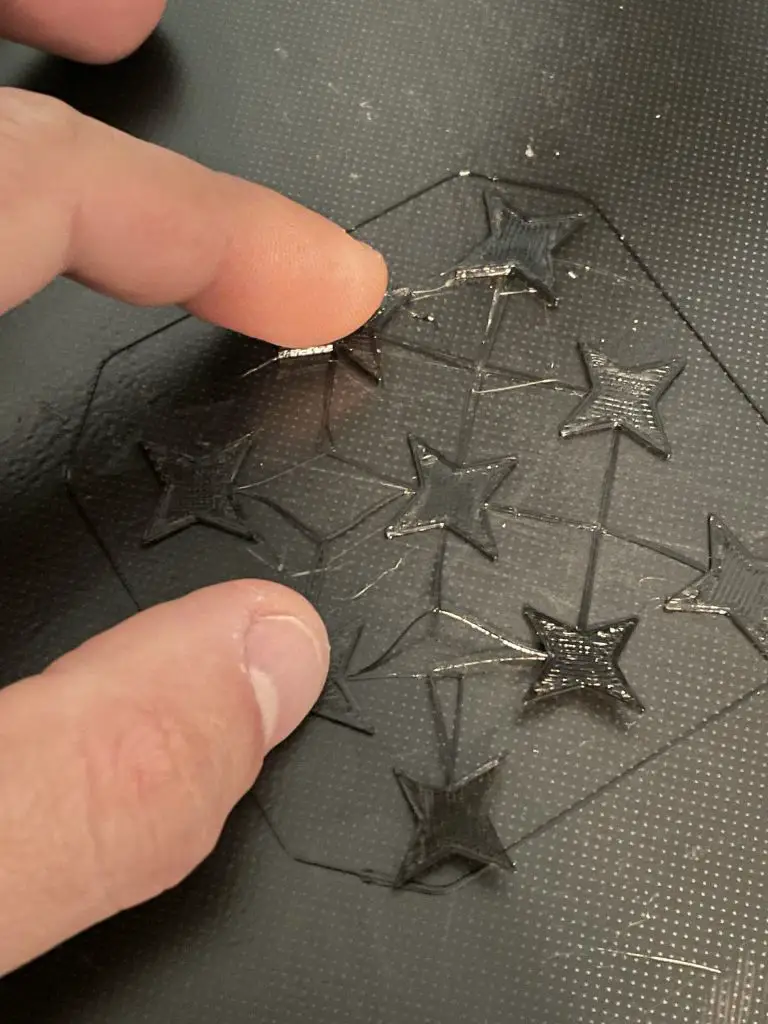
Lastly, I printed a wide, flat part with PLA. This was the first time I had difficulty getting a part off the glass.
Our take:
Both PETG and PLA passed the “Stars” adhesion test with flying colors. Adhesion has been so good that it’s starting to convert me from a PEI spring steel sheet… mostly because bed leveling is so easy with the built-in leveler.
How fast does the VR-6 SE nozzle take to heat to 200°
1 minute and 25 seconds.
How fast does the VR-6 SE bed take to heat to 50°
1 minute and 33 seconds.
I also tested how long it took to get to 60°C, which was somewhere between 2 minutes and 2 minutes, 22 seconds.
Manufacturer’s claims – fact or fiction?
Let’s face it – 3D printing suffers from insufferable marketing claims and Creality can be some of the worst.
For this section every manufacturer’s claim gets one of four ratings:
- True – You can feel comfortable believing this claim
- Mostly True – The claim is true enough but may have some caveats
- Mostly False – You should barely trust this claim. There is probably just enough truth to it that the marketing department can sleep at night. Maybe.
- False – This is as close to an outright lie that a marketing team can have. Fully ignore the claim.
Leveling free
Verdict: True
The automatic mesh bed leveling works extremely well (at least with the Community Edition firmware upgrade).
Unlike with my Ender 3 V2 I’ve had nearly no issues with bed leveling.
Five-minute assembly
Verdict: True
The CR-6 SE was extremely easy to assemble.
With just 8 screws I was able to put it together in roughly 5 minutes.
Quiet printing
Verdict: Mostly False
One of my CR-6 SE printers is LOUD at idle. Creality is notorious for using very quiet mainboards and then shoots it all to heck by using cheap, rattle-your-teeth loud fans.
This only earned a mostly false because printing doesn’t really add any noticeable noise and because another CR-6 was rather quiet.
Either way, I wouldn’t print with this in my bedroom.
Effortless filament feed in
Verdict: Mostly False
The extruder has a clever design (and that’s the last nice thing I’ll say about it).
Feeding filament is certainly easier than in my Ender 3 but nowhere near as easy as a Prusa.
And that brings us to their next claim…
Reliable extruder
Verdict: False
Horses**t. Do not believe a word of this.
Creality outdid themselves by creating Satan in an extruder.
It is underpowered and designed to induce violence and hate.
While I haven’t had any major issues with the extruder operating – I once took it apart. DO NOT EVER TAKE IT APART. The stupid extruder has a clever, but completely-impossible-to-ever-reassemble design.
I’m literally getting angry writing this review, that’s how much I hate this stupid thing. Replace immediately and don’t look back.
Neat and Notable appearance
Verdict: False
Go to bed, Creality marketing department, you’re drunk.
The CR-6 SE looks like any Creality bedslinger… there is absolutely nothing special about how it looks.
Intuitive Operation
Verdict: True
I really like the touch screen interface of the Community Edition. And because you’re insane if you don’t start by flashing the firmware to the community edition – I will only review it assuming you’re planning on the firmware upgrade.
Portable
Verdict: Mostly False
If having a handle means that it’s portable then I guess.
But it’s like saying a 12′ (3 meter) folding ladder is “portable”. Sure… you can move it about but you’re certainly not bringing it over to a sleepover (or to work).
Main Features of the Creality CR-6 SE
Dual Z-axis Screws
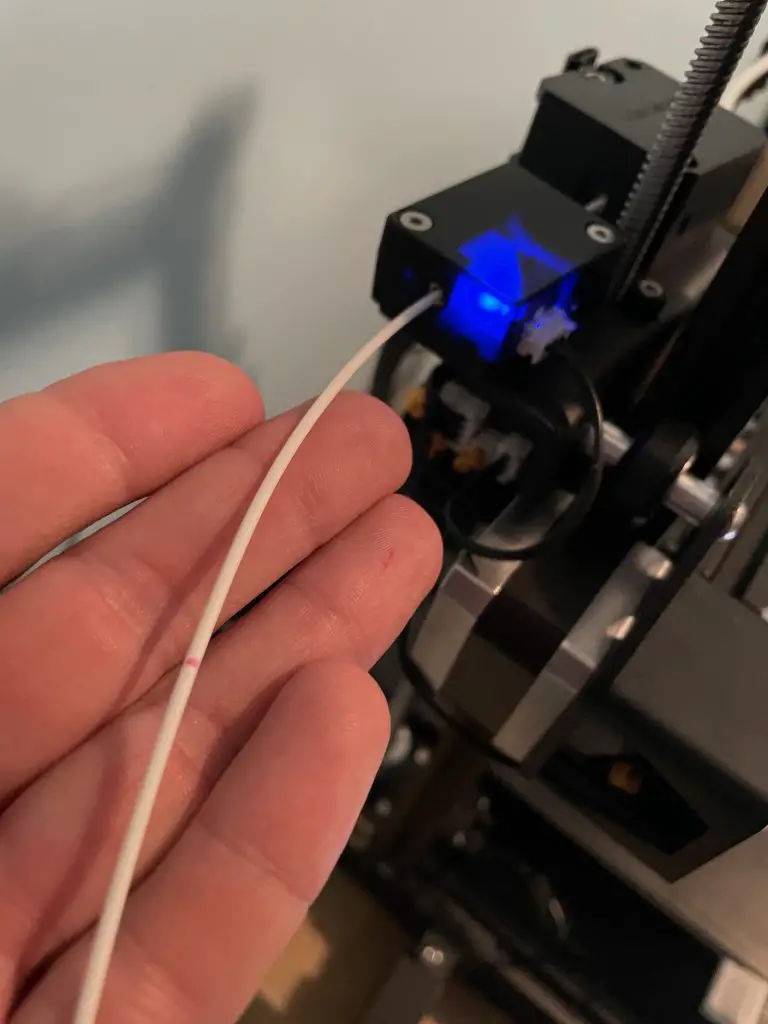
Unlike Creality’s lower-end 3D printers, the CR-6 SE has dual Z axis screws. Printers with a single Z can end up drooping and being difficult to get the bed level – so this is a useful feature.
Automatic mesh bed leveling
No matter how well built a 3D printer is, it’s almost guaranteed that the bed will have slight high spots and slight low spots.
Many of the higher-end 3D printers use a sensor to measure the exact height of each point on the bed and calibrate a 3D mesh. This allows the print head to move slightly higher or lower depending on if it’s over a high spot or low spot.
The Creality CR-6 SE has a unique mesh leveling system that uses a strain gauge attached to the hotend. This freaked me out at first as I watched the hotend look like it was plowing into the bed, only to gently touch it and move back.
One downside of this system is that it is very sensitive – triggering when I was clipping some filament that had started oozing pre-print.
Built-in LED
It’s cute, but I’m not sure if it’s all that useful.
The CR-6’s mesh leveling system includes an LED to show that the strain gauge is registering a touch.
Carborudum glass
Carborundum Glass is a coated tempered glass material from Creality. I’ve found it to work well at times. It is supposed to approximate glass with a kapton tape layer – adhering well when hot and releasing easily when not.
I’ve found that it works great when paired with automatic mesh bed leveling, such as with the CR-6 SE.
[The] composite nano molecule coating has high viscosity after heating, which [gives] the model … strong adhesion.
Creality.com (edited for clarity due to translation issues)
I still find I need to use hairspray on the CR-6 and a gluestick on the Ender 3 V2. Maybe if I soaped my bed after every print but that is too much effort.
In regards to durability and hardness of Carborundum glass:
this is the combination of chemically tempered glass and [a] surface composite coating… The hardness can be up to 8 Mohs, [harder] than aluminum and copper. It [is] resistant [up] to 400℃ and use repeatedly without reducing performance.
– Creality.com (edited for clarity and extreme gramatical errors)
Power failure print resume
While the CR-6 SE motherboard allows for print resume on power loss, I’ve yet to need this feature (or have it work when tested).
A common feature now on nearly all 3D printers and certainly nice to have but shouldn’t sway your opinion on one printer VS another.
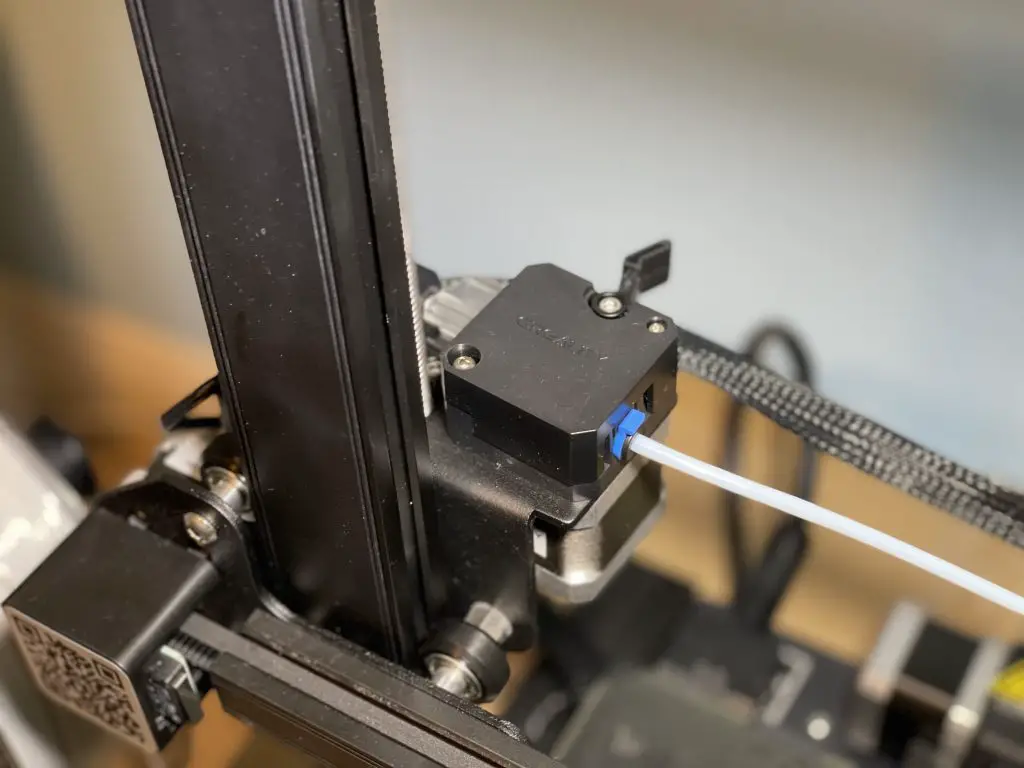
Filament runout sensor
Mid-tier ($350+) 3D printers usually have a filament runout sensor now. This allows you to print every last inch of filament you have.
Unlike the power failure print resume feature – this is one that gives me comfort when the spool is at its last 10% and I just need to print a small part. Great for peace of mind.
Built in tool drawer
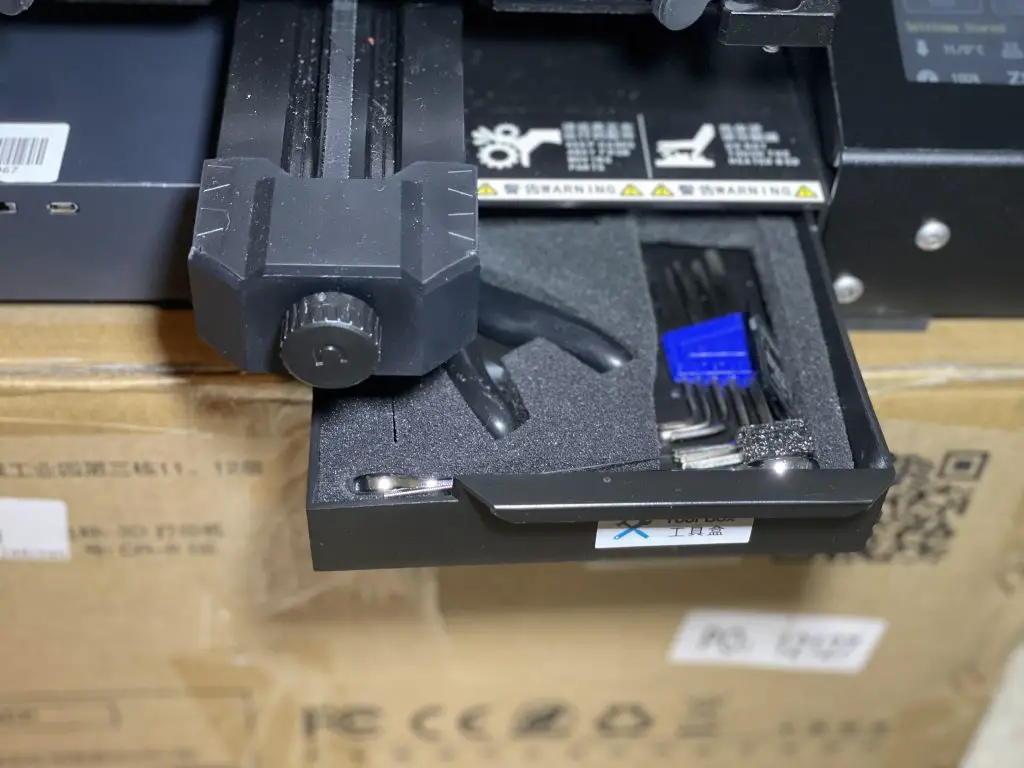
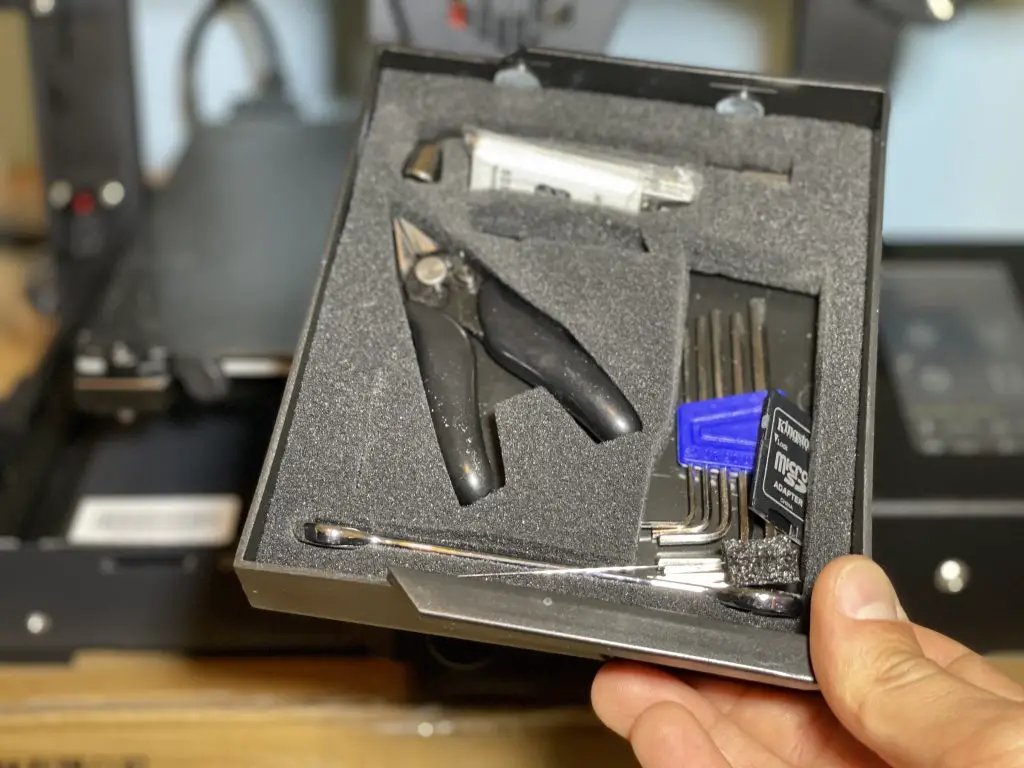
One thing I really like about the CR-6’s tool drawer is that they included cut-out sections for each tool. My Ender 3 V2 tool drawer is just a mess, so this is nice to have everything in its own spot.
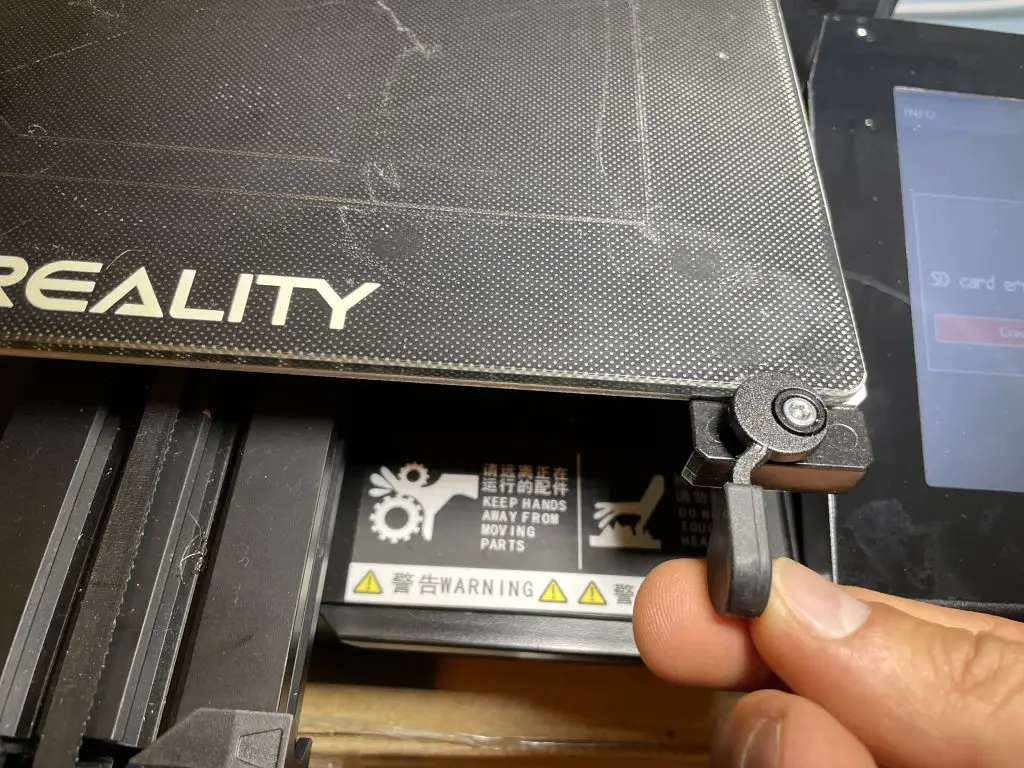
Optical Z stop sensor
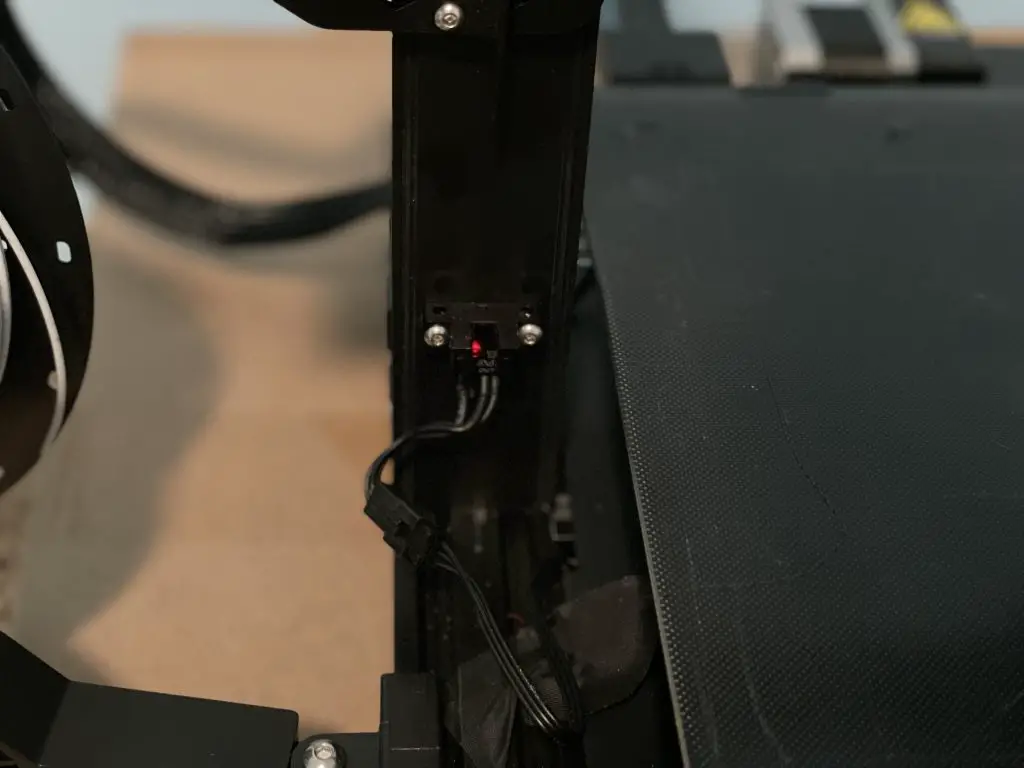
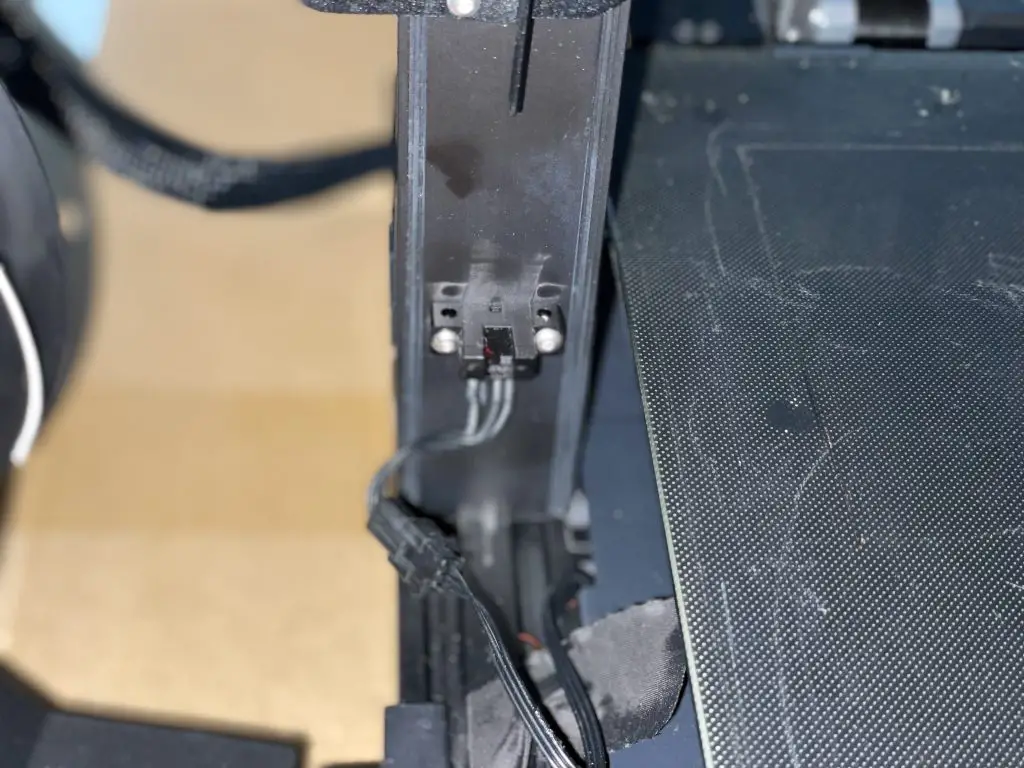
I’ve heard that the optical sensor can cause issues that result in the print head slamming into the bed. It’s a nifty little setup with a ~3cm post that trips the sensor – telling it to look for the strain gauge response.
Full SD card reader
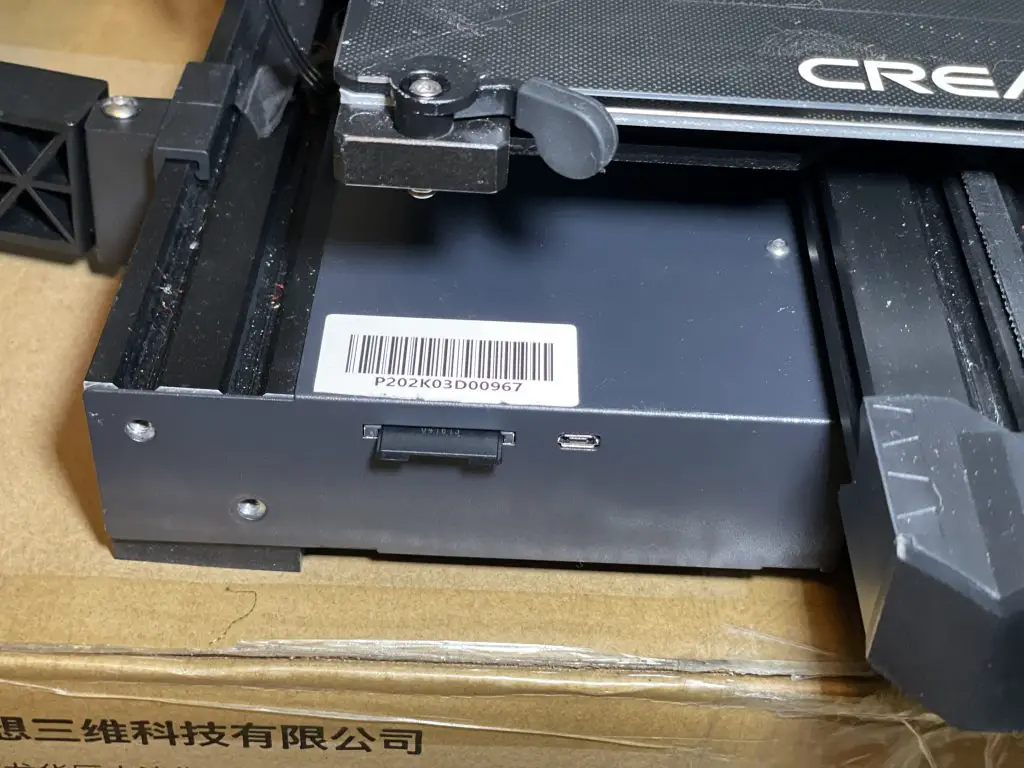
Many people complained to Creality about using microSD cards in other printers. You get a full-sized SD card slot on the CR-6.
Frankly, I just use Octoprint because swapping SD cards is a pain – so it didn’t make any difference for me (I actually had to look around my house to find an SD card for this picture).
Touch screen
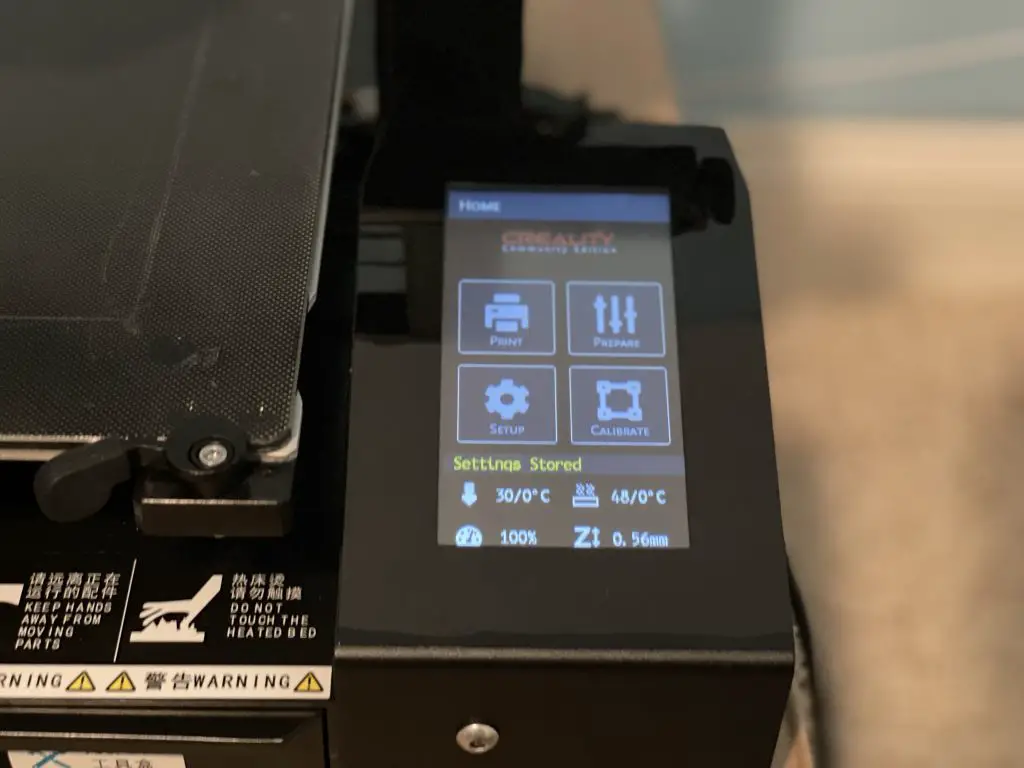
While I wouldn’t buy the printer because of the touch screen – it is a touch faster to use than an Ender 3 knob.
Also, the user interface on the Community Edition software is quite clean – better than my Prusa MK3S+.
X and Y belt tensioners
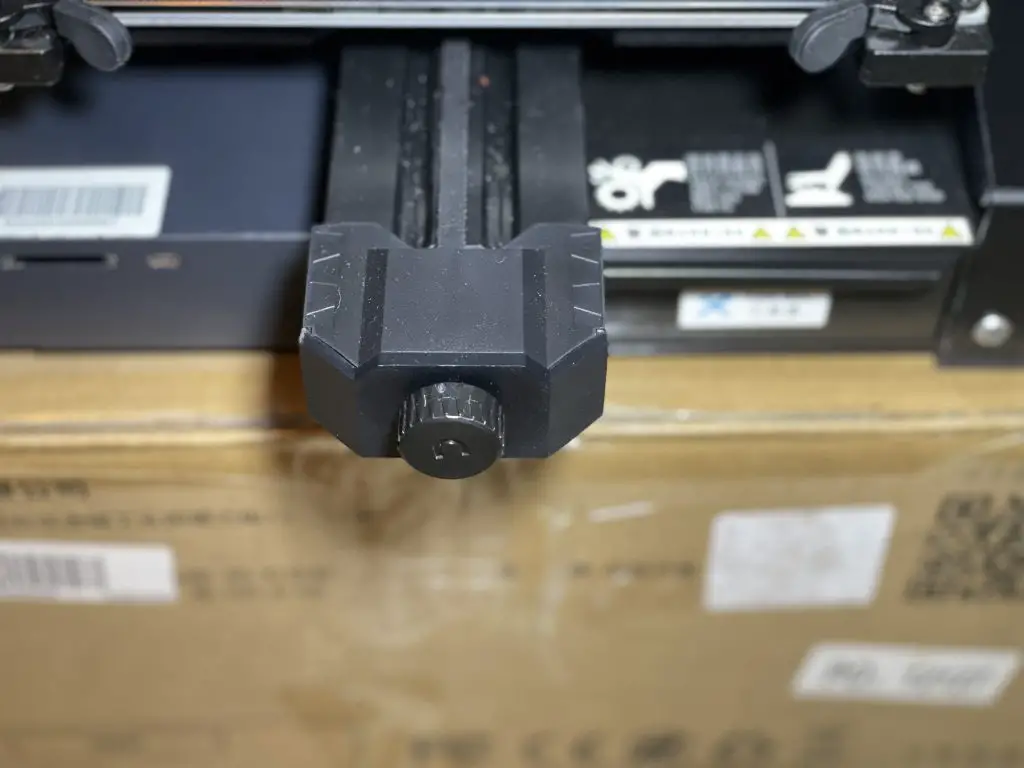
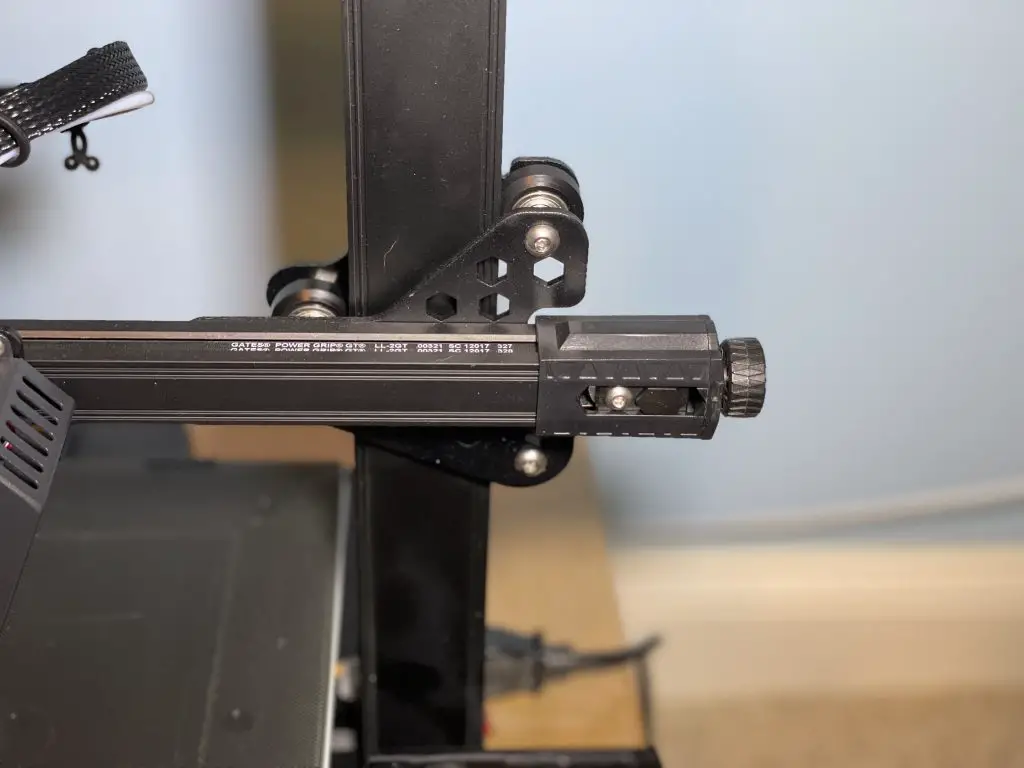
Like the Ender 3 V2, Creality includes tensioners for both the X and Y belts. It gives you some control but for beginners can be difficult to tension properly without doing some research.
Hint: hold the belt and gently push the hotend assembly or bed by hand. If the belt skips teeth, tighten. You don’t want it too tight as it’ll wear out the belt and assembly rather quickly.
Foldable filament spool
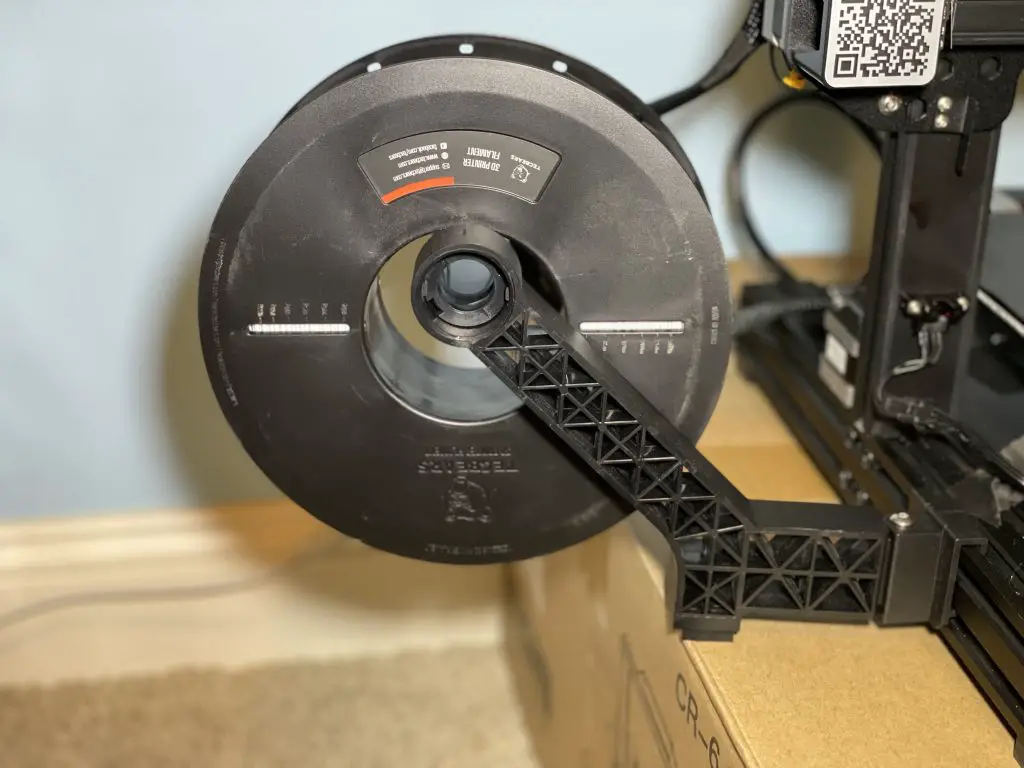
I’m torn on this. Having it to the side makes the CR-6 SE printer more portable (which doesn’t really matter) and not as tall but takes up more horizontal footprint.
I haven’t really found folding to be a useful feature so far.
“Cleverly” designedExtruder
While the extruder on the CR-6 is a clever design, it’s also the main thing I (and everyone online) have complained about. Ditch it ASAP.
Carrying handle
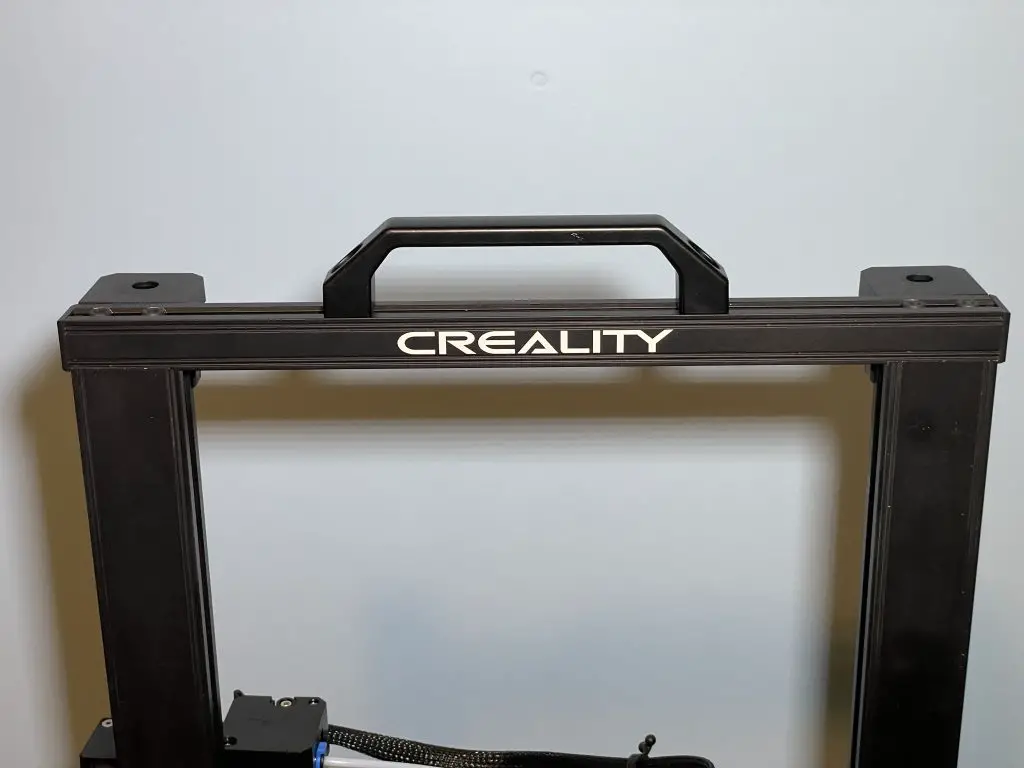
The carrying handle is a nice-to-have feature that I’ve used a little bit. On most printers, you just carry it by the top crossbar.
With Creality’s dual Z screws (and the belt that ensures they don’t move out of sync) it’s a little more difficult to pick up so they included this handle.
I’ve used it a few times carrying the CR-6s around my house – mostly for maintenance while watching TV with my wife.
Quick release bed holders
These quick releases for the CR-6 SE’s bed is a nice touch. You won’t use them often but they give an extra 5mm of print space and look more professional than a paper binder.
All specs
| Type | Cartesian / i3 / Bedslinger |
| Price | $429 |
| Year released | 2020 |
| Machine size (X*Y*Z, in mm) | 442x462x540 |
| Bed leveling | Automatic mesh bed leveling |
| Heated bed | Yes |
| Max bed temp | 110°C |
| Stock/included bed material | Carborundum glass |
| Enclosed chamber? | None |
| Stock Hotend | CR-6 SE/CR-6 MAX/CR-5 |
| Hotend build | PTFE lined |
| Max printing temp | 255°C * |
| Extruder type | Bowden |
| Extruder drive | Single Drive |
| Display | Touch Screen |
| Filament Runout Sensor | Yes |
| Power Failure Print resume | Yes |
| Build Volume (LxWxH in mm) | 235x235x250 |
| Z axis | Dual Z |
| Moves on | Wheels |
| Power Supply | 24V 350W MeanWell power supply |
| Amount of assembly required | Little (under 3 hours) |
| Community size (FB) | 12,000 |
| Community size (Reddit) | 3,500 |
CR-6 SE Online Reviews
Alternatives to the Creality CR-6 SE
Prusa i3 Mk3s+ (9.7/10)
The Prusa mk3s+ is our favorite i3 style (aka Cartesian XZ aka “bedslinger”) 3d printer on the market.
It’s the printer we’d buy for our mom… if we could afford it.
Our verdict
Outside of the slow print speed, I’m quite impressed with the Creality CR-6 SE. It’s feature packed, larger than the Ender 3 series, and a really, really easy printer to get good results.
If you’ve got this far, you probably know that this is the printer for you. Fortune favors the bold, so if this guide was helpful please consider purchasing through my affiliate links so I can purchase (and review) more 3D printers.