One of the best ways to get really familiar with 3D printing and get yourself on a really strong start is to build your own 3D printer. It may seem intimidating at first, but it will be a lot of fun and most importantly, it will be a great learning experience.
If you’re wondering how to build a 3D printer, you’ve come to the right place. In this post, we’ll talk about building FDM or FFM 3D printers, as these are the most common. SLA printers are much harder to build, so we’re not going to touch on those.
With that out of the way, let’s get started!
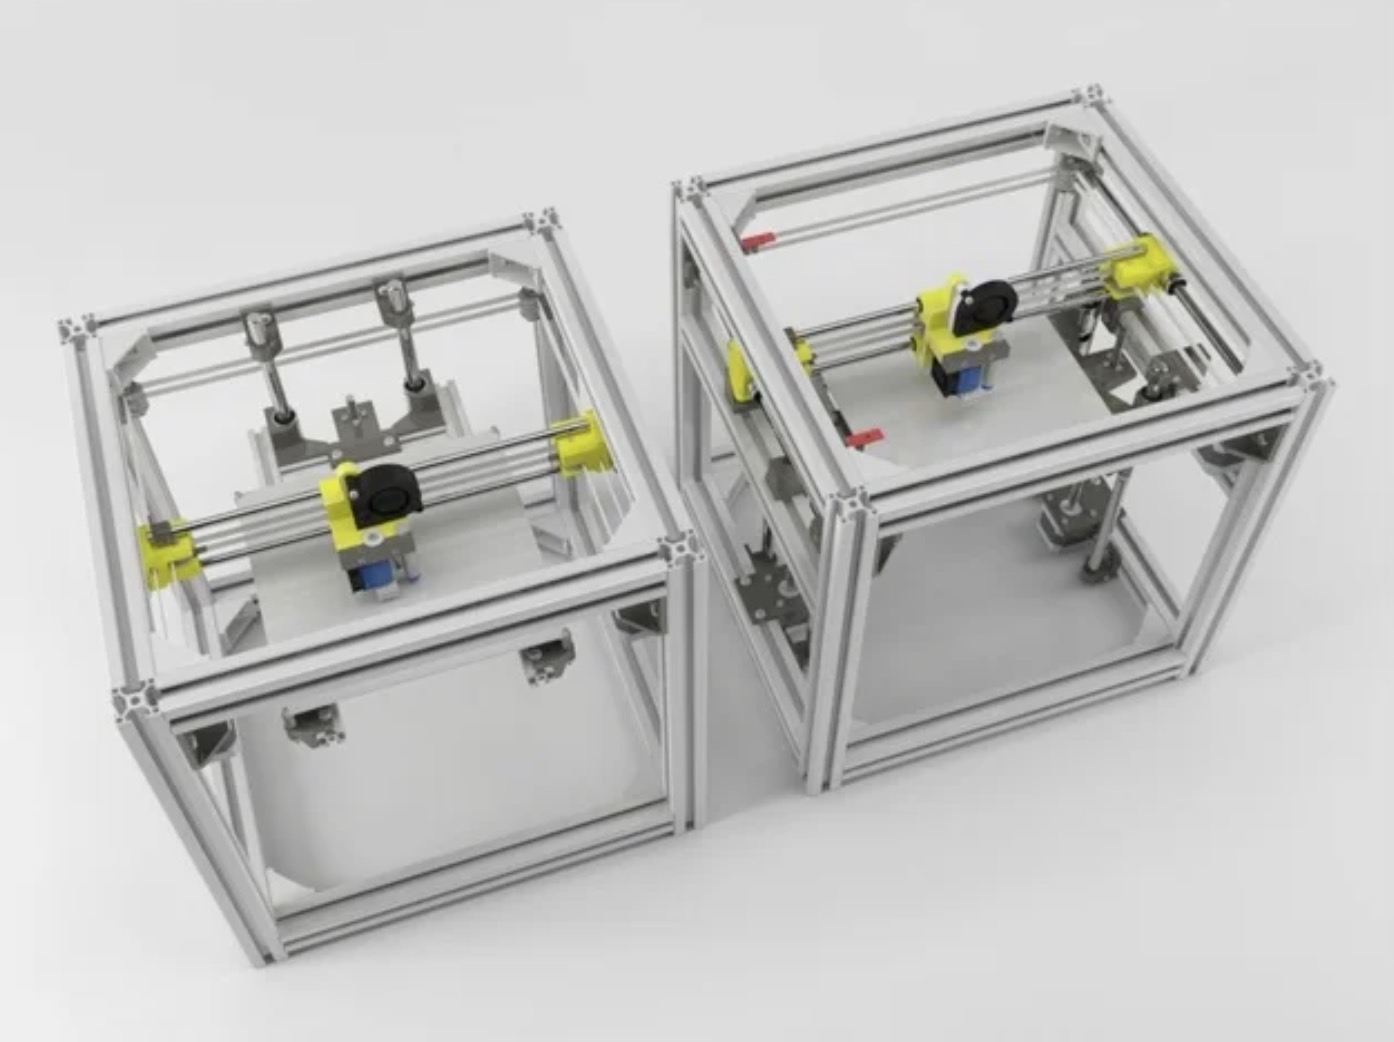
Image credit: Thingiverse Scott3D
How to build a 3D printer: should you?
The first question that we have to deal with is if you should build a 3D printer.
To that, my answer is a resounding yes.
Not only is building a 3D printer lots of fun, but it will also teach you about the ins and outs of your 3D printer. Knowing how your 3D printer really works is critical to making the most of your 3D printer.
3D printing is a lot of printing, a lot of tweaking, and a lot of maintenance, so if you happened to assemble the machine yourself, it will be very easy for you to fix it.
My first 3D printer was the Tevo Tarantula kit. I watched a few videos on how to build it, and followed along to assemble it myself. The assembly process taught me a lot about how the printer worked, and once the assembly was done, modding the printer and maintaining it was that much easier.
Fixing a 3D printer yourself is much more convenient than having to send it to the manufacturer or call someone over to do it for you!
Finally, the last advantage of building your own 3D printer is cost. 3D printer kits are much cheaper than pre-built 3D printers, and the quality is comparable to a certain extent. You can also build a 3D printer completely from scratch, but it may not turn out to be as cost-effective as buying a kit unless you already have spare parts lying around.
When should you not build a 3D printer?
If you’re a business owner looking for a quick solution and don’t have the time to get your hands dirty to build a 3D printer, then you should certainly opt for a pre-built machine. These work almost out of the box with minimal tweaking and it will help you get started right away.
Also, if money is no issue and you’re willing to pay a little extra to forgo the learning curve, a pre-built printer can be a good solution.
How to build a 3D printer from a kit
Building a 3D printer from a kit is a really good starting point for newbies and pros alike. Kits are self-contained, as they have all the parts and tools you need to get your 3D printer up and running.
They also leave out any guesswork, as they come with (sometimes confusing) instructions to help you assemble the whole printer from start to finish.
3D printer kits have come a long way from the Anet A8s of old, so they’re definitely worth checking out.
You can get them for quite cheap, too. Creality 3D makes really budget-friendly 3D printers like the Ender 3 Pro and the Ender 5. For bigger sizes and slightly bigger wallets, there’s the Creality CR-10, too.
Tronxy is another Chinese company that makes 3D printer kits.
If money is not an issue and you’re looking for the absolute best 3D printer kit around, the Prusa MKIII is one of the best 3D printers, period. You can buy the printer assembled or unassembled, depending on where you get it from.
Tips for building a 3D printer from a kit
Study the instructions and watch build videos
While you may be gripping your forehead and calling me Captain Obvious, this is an often underlooked step! I suggest you do both: study the instructions and find YouTube videos for assembling your particular 3D printer model.
Some cheaper 3D printer kits are notorious for having confusing instructions, and while you may be able to figure it out, watching an assembly tutorial on YouTube makes a huge difference.
Many kits also come with QR codes you can scan to go to a video walkthrough for assembly.
If this is your first 3D printer, then this is a critical step. Experienced 3D printer builders may choose to forgo watching a walkthrough and just use the instructions instead.
However, the frustration of using the wrong bolt in a part you have assembled 10 things on top of, only to have to disassemble everything to get to that one bolt is very real.
Save yourself some time and frustration and do some studying beforehand :).
Label all the parts as you open them
3D printer kits come with a lot of small nuts and bolts. Some kits like the Tarantula that I built had pre-labeled bags which made it a lot easier to assemble. You just had to open the correspnding bag on each step and that was that.
In case your 3D printer does not come wiht labeled part bags, grab a sharpie and label the bags as you open them.
Not only will this help you during the build itself, it will also come in handy during maintenance.
Keep all the spare parts
Good 3D printer kits usually ship with extras, so hold on to them after the build is complete. These will come in very handy for any mods and repairs you want to do.
Hold on to the spanner and Allen keys as well. Those sizes are really useful to have, anyway!
Join a community
Most of the popular 3D printer kits like ones from Creality 3D and Tevo have very active and very helpful online communites on platforms like Facebook and Reddit.
Whichever printer you get, it may be helpful to join a community to connect with like-minded people.
It will help you share your progress and projects, and you can also get troubleshooting help from people who may have had the same problem.
This is the Creality 3D official group
Have patience
The last bit of advice I have for you before you build your 3D printer is to have patience! It may take a few attempts to get it right, but be patient and take a break if you’re feeling frustrated halfway through the build.
How to build a 3D printer from scratch
If you’re a seasoned maker and are looking for your next challenge after your CNC machine or router, you’re probably up to the challenge to build a 3D printer from scratch.
Again, I would not recommend this route for complete newcomers to the hobby. A kit will get you off the ground much faster.
Follow a build guide
Even if you’re building from scratch and sourcing all the parts yourself, it’s helpful to follow a build guide of an existing custom-made 3D printer.
The hypercube 3D printer is a good place to start. It has all the 3D printed parts you need a well as a list of electronics and hardware.
Related: how to 3D print a 3D printer?
Things you need to decide on
Before you start sourcing your various parts, these are the decisions you’ll need to make:
Type of printer
What kind of FDM printer are you looking to make? A simple cartesian robot is the easiest way to go, as they’re the most common, easiest to maintain, and have scope for a decent build volume.
Alternatively, you could build a delta 3d printer, which allows for a taller build volume and prints much faster since it’s the nozzle that moves on all the axes.
The type of printer you decide to build will determine the frame you choose.
Build volume
The build volume you choose to go with will determine the overall size of the printer. With build volume, you will have to consider both the area and the height.
As far as area goes, you may be limited for choice by the bed sizes that are already available on the market. The easiest way to go about this is to get an aftermarket bed for an existing printer and just use that in your build.
With height, you have a lot of flexibility. Hypothetically, the sky is the limit! You can make your 3D printer as tall as you like, as long as you can find a way for the gantry to move up uninterrupted.
Nozzle size
While this is not something that will get fixed in stone, the nozzle size is a good determinant for what you’ll use the 3D printer for. If you plan on printing miniatures that require lots of detail, then you’d do well with a 0.2mm nozzle – and you may even be able to reduce the overall footprint of your 3D printer by using a smaller bed.
For larger, faster prints, you may want a larger nozzle like 0.8mm or greater, and in this case, you’ll have to get a bed size and a height that will accommodate your 3D printing needs.
Extruder type
Finally, you’ll need to decide what kind of extruder will you use: will it be direct-drive or Bowden? A Bowden extruder has the advantage of speed and reduced weight on the print head. A direct-drive extruder can use a smaller, lighter stepper motor and works better with flexible filaments.
What parts will you need?
Now that you’ve taken these decisions, it’s time to source your parts:
Frame and parts
The easiest way to build a frame for your 3D printer is to use 2020 or 2040 aluminum extrusions. Aluminum extrusions are really common, cheap, and can be assembled together using bolts and t-nuts. It’s also really easy to make brackets for 2020 and 2040 extrusions.
At the very least, you’ll need:
- 1 extrusion for the gantry
- 4 extrusions for the Y frame
- 4 extrusions for the X frame
- 1 to 2 extrusions for the Y axis
You’ll also need hardware to hold the extrusions together.
Stepper motors
Stepper motors are what make the axes of the printer move. Your printer has 3 axes for which you’ll require a stepper motor. You can also use two stepper motors for the Z axis.
The extruder is also driven by a stepper motor, so you’ll need one for that, too.
That brings your total to:
- 3 or 4 stepper motors for the 3 axes
- 1 stepper motor for the extruder
You’ll also need stepper motor drivers if your control board does not have them built-in.
Bed
The print bed is what the material will be laid down on. You want to use a heated bed, as you’ll get much better bed adhesion with a heated bed.
You can also use a regular bed like a non-heated aluminum bed but you will only be able to print PLA, nothing else.
The best thing to do is to get a stock bed for an existing printer, like the Ender 3 or the Creality CR-10. The connectors are all standard anyway, so it does not matter which bed you get as you’ll be able to connect it to the board without any problems.
Rails or rods
Rails and rods are a really important component of your printer as they are what enable the axes of your printer to move. You will need a threaded rod to move the gantry up and down the Z axis. Get a threaded rod that’s taller than what your planning for the height of your printer.
The X and Y axis can move using either wheels or along rails. Both are good. The Anet A8 uses rails, and most Creality printers use wheels.
Belts and gears
Now that you have a mechanism for the axes to move, you need a way for the stepper motors to pull and push the axes. This is done using bearings and belts.
The stepper motor is connected to the axis using a belt, which is driving by a small gear attached to the motor. This allows the stepper motor to make small steps and use the belts to make the axes move in corresponding steps.
End Stops
End stops are often overlooked but a very important part of a 3D printer build. End stops tell the printer that the axes has gone to the end of its movement.
This is important because the main board has no way to know how far the motor must make the axes move to get from one extreme to the other.
You’ll need 3 end stops: one for the X axis, one for the Y axis, and one for the Z axis.
Hot end and extruder
Finally, we get to the main part: the hot end! Here, you’ll have to decide if you are opting for a direct drive or Bowden extruder. The extruder will determine the kind of hot end you buy.
Our favorite hot end to use is the E3D v6: it’s light, very well built, and compatible with a variety of nozzles.
The E3D v6 comes in a Bowden and a direct drive version.
As far as extruders go, you have a few choices: you can either get an extruder 3D printed from one of the many designs available on Thingiverse, or you can use a pre-built extruder like the Micro Swiss or e3D Titan, which are both top of the line.
Main board
Now for the brains of your 3D printer. Get a board that’s compatible with open source software like Marlin, as there is a large community behind it and there are lots of updates and documentation.
One of our favorite boards to use is the SKR V1.4 board which is a 32 bit board compatible with Marlin firmware. 32 bit boards are really good and can produce really high quality prints. You can even use this board as an upgrade for your existing 3D printer.
Depending on the product you buy, you may need to get separate stepper motor drivers.
Power supply
Finally, you’ll need a power supply. You’ll have to see what kind of power supply is compatible with your heated bed and your main board. Most boards use a 12V power supply, though some are compatible with a 24V power supply, too. Make sure you match the voltage before you buy!