Click click click – is your Ender 3 extruder making skipping, clicking, or grinding sounds? A skipping extruder is one of the most frustrating sounds to hear from your 3d printer and the Ender 3 is far from immune.
So, why is your Ender 3 extruder skipping?
The first (most common) reason is you are trying to push more filament through your hotend than it can handle. You might be trying to print too fast or too close to the bed, resulting in backpressure the extruder can’t push through.
The second is that the junk plastic Ender 3 extruder arm cracked and cannot get enough “bite” to move the filament.
To fix a clicking/grinding/skipping extruder, look for blockages, poor extruder tension, a cracked extruder arm, poor bed leveling, or too high print speeds.
Thankfully, if you hear your Ender 3 extruder clicking most of the time solving it is straightforward.
Here are ten ways you can diagnose and solve a skipping or clicking extruder.
Let’s dig in.
Ender 3 Extruder Skipping: Solutions to try
A skipping extruder is a sign that the 3D printer is trying to push filament through the nozzle but it is not flowing for some reason.
Like any diagnosis, the goal is to figure out why filament isn’t flowing by working step-by-step from the easiest-to-solve issue on down.
So, we’ll start with easy solutions and progress to more difficult ones.
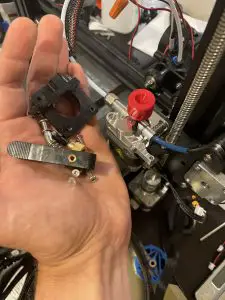
Check your extruder arm for cracks
Creality Ender 3s (and the Ender 3 Pro, Max, and V2, but not the S1 series) use a Bowden tube extruder setup with a plastic extruder tensioner.
These plastic extruder tensioner arms are notorious for cracking and usually crack on the underside where you can’t see them.
Thanks, Creality.
If your tensioner arm is cracked it won’t be able to put enough tension on your filament.
If you’re hearing more of a grinding sound, are experiencing under extrusion, or see filament shavings then this is the best place to start. Pull the extruder arm off and check underneath for cracks.
Or just use this chance to upgrade to a better extruder.
I looked at all of the cheap metal ones on Amazon but they all had pretty polarizing (or obviously fake) reviews. I ended up buying the Microswiss dual-gear extruder as I’m working towards a 1000mm/s Ender 3 setup.
Yes, it’s more expensive but looking at the gear teeth you can see such a difference in quality VS the stock Creality ones or any of the $14 ones on Amazon.
If you need a refresher, here’s a video on taking off the extruder assembly (skip to ~1m as you really only need to remove the arm).
Check your volumetric flow rate
When you think print speed you might think about the settings in Cura/your slicer – which are linear print speeds (EG 45mm/s).
But the real bottleneck is volumetric print speed (see The Illusion of Speed article for more info and how to find your printer’s max volumetric print speed).
Here’s the absolute easiest way to increase your print speed and volumetric flow rate.
Buy a CHT nozzle (use my promo code, GARRD5, for an easy discount).
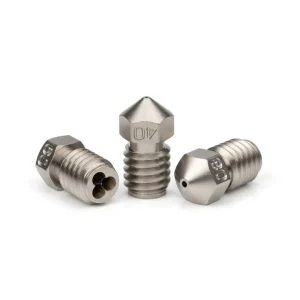
These things are sweeeet. By chopping filament into three pieces before melting they can immediately increase your print speed by 30%. For only $20 it’s the cheapest way to boost your print speed by far.
I checked around and you can’t get them on Amazon (at the time of writing) and everyone has them for the same price – so I snagged you that coupon code to save a little green.
You’re welcome.
Not convinced? Check out their promo vid…
(Don’t forget promo code GARRD5 for your discount for being my friend.)
A stock Ender 3 (Pro and V2 included) can push about 8.5 mm^3/s, depending on the filament type and temperature.
To calculate your volumetric print speed multiply Linear speed (mm/s) * layer height (mm) * line width (mm).
So a 0.45mm line (extrusion) width at 0.2mm height at 45mm/s linear speed is printing at 4.05 mm^3/s, well below the 8-12 mm^3/s that a stock Ender 3 series (V1, Pro, Max, V2, not S1) can typically handle.
Put another way, if you’re printing with a 0.4mm nozzle at a standard 0.45mm width at 0.2mm height, expect to have some problems and extruder clicking starting around 88mm/s linear speed.
If that’s the case, slow it down or start upgrading to boost your speed capacity.
Leading us to our next item to test…
Increase print temperature and/or decrease speed
If you need to print something now and don’t have time for a real diagnosis, try increasing your print temperature and decreasing your print speed.
It is possible that the filament you’re using can’t melt as efficiently at the temperature you’ve set, so increasing the temperature will usually get it flowing out of the hot end as it should.
Decreasing the print speed also has a similar effect. A slower print speed means less filament has to flow out, so you’re not putting as much strain on the extruder motor.
If the higher temperature fixes the problem, you can try bumping up the print speed back to your original setting and seeing if it still works OK.
I’d strongly recommend printing a temperature tower for each type, color, and brand of filament you own.
Nozzle too close to bed
Another super common issue is that the nozzle is too close to the bed. Because there is not enough space between the nozzle and the bed, the filament is not flowing out as it should.
You’ll know your nozzle is too close if you see a squished middle and two parallel lines on your first layer or ghosting.
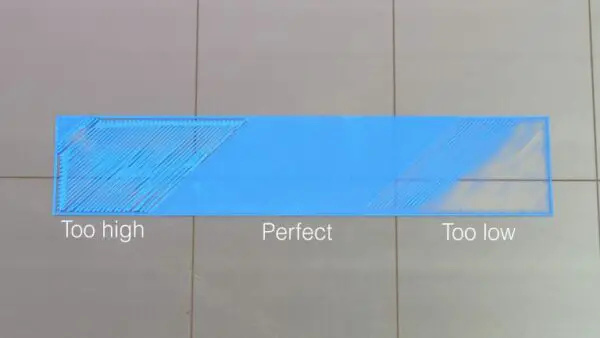
If you have too low of an initial layer height the gears of your extruder will try to push the filament out… but there’s no room for the filament to flow.
Without flow you’ll get backpressure and, like a clog, you’ll hear a grinding or clicking noise.
Re-level your bed and try printing again, paying close attention to the first layer.
Side note, after buying my Prusa i3 MK3S+ (it’s absolutely night and day VS the Ender series… I click “print” then come back to find my finished print… no fuss), I fell in love with magnetic PEI sheets VS the glass beds that ship with the .
I bought but wish I’d seen this one first is it’s two-sided, cheaper, and from Comgrow – Creality’s main supplier in the US:
Blockage in the extruder
Budget 3D printers like the Ender 3 (Pro/Max/V2) may not have as accurately machined tolerances in the extruder as other printers.
Also, because the Ender 3 is a Bowden setup, there are a lot more places for things to get stuck.
On top of the extruder, there is a little pneumatic coupling. The Bowden tube is inserted into the coupling, where it goes down into the extruder.
The filament moves between the motor gear and the bearing and goes into the Bowden tube. If the coupling is loose, or the Bowden tube is out of position, the filament will not flow correctly and your extruder will start clicking.
Try taking your extruder apart, cleaning it (if necessary), and reassembling it to see if that fixes your extruder clicking issues.
This might be a good chance to upgrade to the better toleranced, teflon coated Capricorn bowden tubing. It’s usually less than $15 and an easy swap.
Blockage in the nozzle
If the extruder is not the issue, then the issue is most likely in your nozzle.
Debris or blockage in the nozzle can prevent the filament from flowing out, and your extruder’s gears will start slipping on the filament.
Cleaning the nozzle of an Ender 3 is pretty straightforward, but it can be a little cumbersome.
The first method to try is the atomic or cold pull.
To do this, remove the PTFE tube from the hot end and heat up the hot end to around 190 degrees C. Insert some filament directly into the hot end and let it start to melt.
Now decrease the temperature to 160 until the filament is still soft but no longer melting. Decrease the temperature 10 degrees more, and as it becomes a little more hardened, yank the filament out.
You should have pulled out some debris mixed into the filament.
Do this a couple of times and that should fix it.
You can also insert a very tiny needle into the nozzle while it’s hot and try to clean it out from the bottom, too.
If none of that works, you’ll have to unscrew the nozzle and clean it out yourself. Don’t forget to follow your manufacturer’s recommendations when removing or replacing a nozzle.
Blockage in the hot end
If you have a clean nozzle but still no luck, you may have to remove the hot end assembly and take it apart piece by piece to find the source of the blockage.
If you’ve gotten this far, I hope you’ve double-checked you’re using the right temperature and print speed, and that you’ve leveled your bed a few times!
Open the assembly that contains the cooling fan and hot end, and remove the hotend from the carriage.
Take the whole thing apart and clean out each individual component. You may need to use a flame or heat gun to burn out any debris.
Reassemble and try again!
PTFE tube is degraded/breaking down
When you open up the hot end and clean it up, you may notice that the PTFE tube has degraded. In this case, you will have to replace the PTFE tube.
If you’re still on a stock Bowden tube, we suggest upgrading to . It’s $13 and replaces Creality’s mediocre Bowden tube with a great, well-toleranced, Teflon Bowden tube.
Calibrate your extruder steps (e steps)
If there is an issue in your printer firmware, you may need to calibrate your extruder e steps. Calibrating is a process where you manually measure and see that the extruder is indeed extruding as much filament as it should be.
To calibrate, remove the PTFE tube (Bowden tube) from the extruder so that when the printer extruders filament will go straight up.
Make a mark on the filament above the pneumatic coupling.
Now go into the menu and manually extrude 10mm of filament.
Make another mark right above the pneumatic coupling.
Measure the distance between the two dots to see if that is indeed 10mm.
If the number is off, you’ll need to adjust the extrusion steps, which you can see how to do in the video below (or see our stupid fast way to calibrate e steps):
Increase stepper motor voltage
If that still does not solve the problem, chances are your stepper motor does not have enough power, which is preventing it from overcoming the pressure required during extruding.
Here, what you can do is open up the control panel and find where the extruder motor connects to the mainboard.
Next to the connector, you’ll see a little variable resistor that looks like a small Phillips screw head.
Turning the resistor clockwise will increase the voltage flowing to the stepper motor and give it more juice to push more filament out.
I really don’t recommend trying this unless you know what you’re doing (and have tried everything) as the motor is usually well calibrated out of the box. But there may be rare cases where you’ll have to try this.
Why is my Ender 3 extruder skipping?
You’re
How do you know if your extruder is too tight?
If your spring on your extruder is too tight the gear will start to chew through filament (rather than push it). You might hear a grinding noise and the print head might be moving without any filament being extruded.
This is much rarer than your extruder being too loose, but if you recently replaced your extruder setup and are running into issues, it’s something to check.
Wrapping up
A clicking extruder can be incredibly frustrating when 3d printing and was one of my main pain points when I first started learning how to 3D print.
I got the hang of it soon enough and once you have your printer calibrated and printing properly, you should not run into this issue again.