If you’re constantly running into 3D printing issues which are not resolved no matter what you try, there are two lesser-known settings in your 3D printer that you may wish to tweak: the jerk and acceleration settings.
A word of warning: jerk and acceleration tuning is an advanced tactic. We don’t recommend doing it until you’ve exhausted all other common issues like mechanical faults and filament quality.
With that said, the ideal settings for jerk 6-7 for the x and y-axis and 600 to 700 for acceleration. These numbers are a good place to start, and you can adjust up or down as necessary to get the ideal 3D printing results you are looking for.
But here’s why you should change your acceleration settings or jerk settings: speed, aka reducing print times (often by a lot).
What does the jerk setting do?
Jerk in 3D printing is slightly different than jerk in physics. In 3D printing, Jerk settings affect the maximum speed the print head can be moving before changing directions.
To understand how it works, think of jerky movements. If you were running in a zig-zag motion with very sudden and abrupt changes in direction, you’d experience jerky movement.
The same thing goes for your 3D printer’s jerk setting: it determines how fast the print head moves from the stationary position and how much the print head will slow down before changing direction.
The higher the jerk value is, the print head’s movement from the stationary position will be faster, and the changes in direction will be more abrupt.
Of course, the jerk setting is limited by your print speed, so when your printer actually runs, the jerk setting works in conjunction with the print speed that you specified in the gcode.
As you can see, the jerk setting is quite nuanced: simply raising or lowering it will not magically fix ghosting/ringing issues. They require tuning!
As a quick primer, this is what you can expect:
High jerk settings
- Lower 3D print times as the print head is not slowing down quite as much.
- There will be greater vibrations as the speed is faster and the change in direction is more sudden, leading to ringing and ghosting.
- Louder
Lower jerk settings
- Less stress on the printer
- Movements smoother
- When the print head changes direction, the filament will stick stronger to the bottom layer.
- Less overall noise
Realistically, there will not be a huge difference in print times when you use higher jerk settings unless you’re printing at a fairly high speed. For everyday 3D printing, you may not really notice the difference. And you definitely won’t notice the difference in your slicer as they’re pretty bad at accounting for acceleration and jerk.
With that said, in my Ender 3 Hurricane build tuned acceleration and jerk settings have my prints finishing in half the time the slicer thinks they should.
However, if the jerk value is too high, you will definitely see vibrations manifested as “ghosting” or “ringing”. In that case, turn the jerk down.
What does the acceleration setting do?
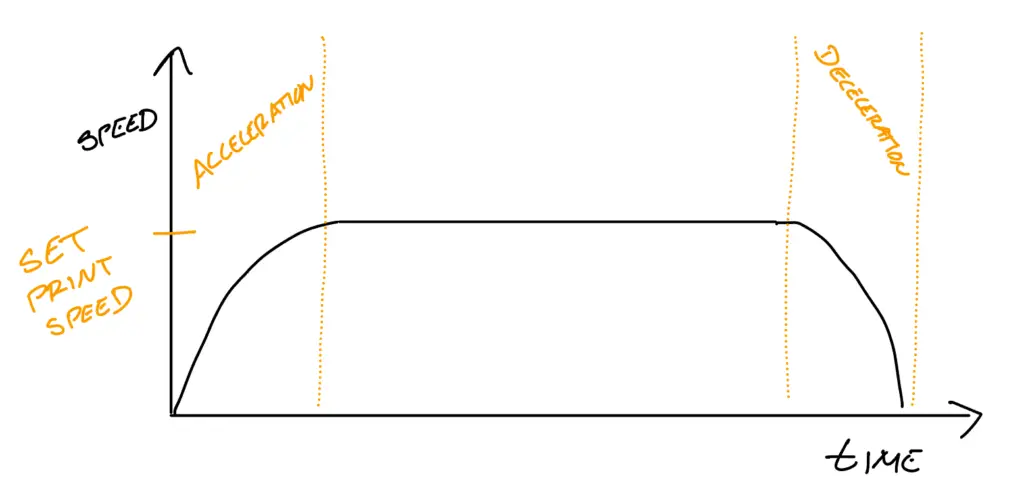
While the jerk setting measures how fast the print head changes direction, the acceleration setting determines how fast the print head reaches the maximum print speed you’ve set in your slicer settings.
It’s worth noting that your printer does not always print at the maximum speed you enter in your slicer. Using the equation below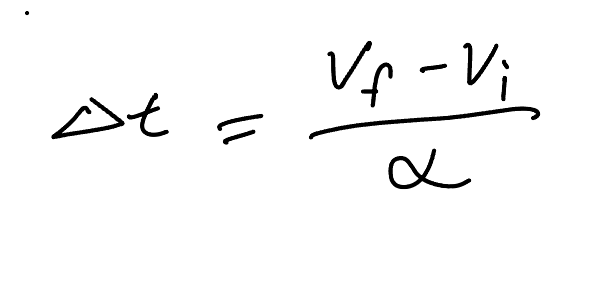
We see that, at a 500mm/s^2 acceleration, it takes 0.12 seconds to reach max acceleration. And, at an average speed of 30mm/s, it would therefore take 3.6mm to reach max speed. It will also take 3.6mm of deceleration.
Compare that to an acceleration of 5000mm/s^2, and your total distance to go from stop, to max speed, to stop again is 0.72mm.
If you are printing at 150mm/s like I am with my Ender 3 Hurricane, that’s the difference between 90mm to accelerate and decelerate to 9mm, assuming a jerk of 0.
To see if your acceleration value and print speed match, you can use this super handy calculator by Prusa Research.
Also, some parts of the model, such as the first layer and supports or rafts tend to print slower.
What’s the difference between acceleration and jerk in 3D printing?
Acceleration, like acceleration in your car (or physics) relates to how long it’ll take for your 3D printer’s hotend to get to your set print speed.
Jerk, on the other hand, is the maximum speed that your print head will change directions. It’s really the speed at which your printer will send maximum current in a different direction, despite the fact the print head is still moving.
Graphed, it “clips” the acceleration graph at the ends.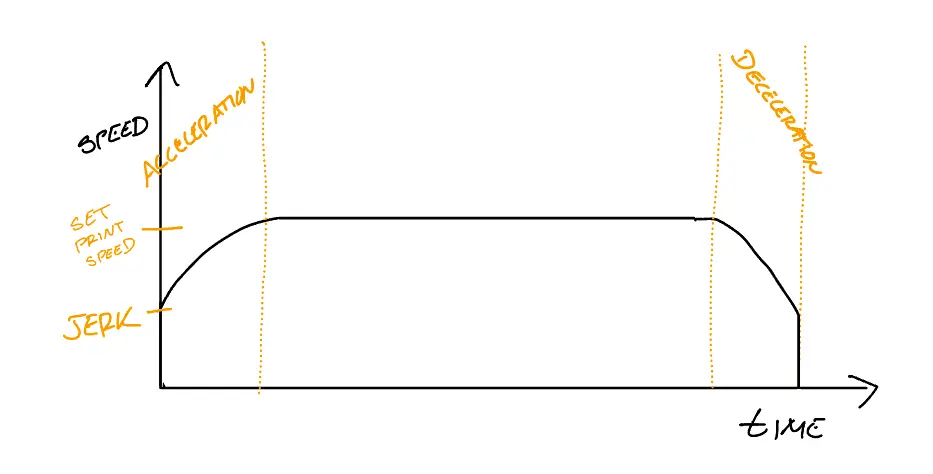
Do you really need to adjust jerk and acceleration?
Until you’ve really dialed in your printer, the default acceleration and jerk settings in the 3D printer firmware are good enough for your 3D printing needs. If you’re not entirely sure what you are doing, you may mess up your 3D printing results if you change the acceleration and jerk settings too much.
Also, you may not be able to notice much of a difference when you change the settings!
However, there are certain cases where you may wish to try changing the settings if you’re not able to fix them using basic 3D printer maintenance or slicer settings:
- Making your printer less noisy
- Fixing Z-wobble
- Fixing a shaky or wobbly printer
- Fixing rough print surfaces
- Fixing skipped layer lines
- Removing ringing and unwanted blobs from your prints
For those of you that are getting good 3D printing results already and you feel you’ve nailed down your slicer profile, it’s worth experimenting with your jerk and acceleration settings to see if that makes any difference.
Remember to note what values the settings were at and go back to those if anything goes awry!
Finding the ideal acceleration settings for your 3D printer
Teaching Tech has uploaded a really useful model to Thingiverse that you can slice with a layer height of 0.2mm and your desired print speed.
Once you slice it, you’ll have to go into the gcode file and manually add code to increase the acceleration value every 5 layers.
This way, you’ll be able to see all the different acceleration values in a single model!
Open the gcode file using software like Notepad++ or Sublime Text.
Scroll down until you find a comment that says Layer 1 (Simplify3D) or Layer:0 (Cura).
Below that, add the following:
M201 X3000 Y3000(M201 sets your max acceleration settings)
M204 P400(This says M204—set acceleration— to P400—400mm/s)
Next, search for Z = 5(Simplify3d) or z5(Cura)
Below that, add:
M204 P800Then search for layer 10, 15, 20, and 25, and keep adding 400 to the acceleration value for every 5 layers.
M204 P1200, M204 P1600, M204 P2000, M204 P2400Save the gcode file and send it to your printer.
Once the print is complete, you’ll be able to see the differences the increased acceleration makes to ringing.
This will help you find a range that works best for your printer, which you can then hard-code into the firmware using the settings menu in your 3D printer.
Jerk vs. junction deviation
Older versions of the Marlin firmware use the classic jerk value, but the newer Marlin firmware uses a value called junction deviation.
To know what you’re using, you’ll need to use a program like Pronterface and send an M503 command to the printer.
Look in the M205 results:
If you’re getting X, Y, Z results, you’re using jerk.
If you’re getting a single J result, you’re using junction deviation.
Repeat the same test as you did with the acceleration test using the same model.
In the sliced gcode file, you’ll now enter M205 instead of M204.
For jerk, use the following values in 5 layer increments as you did above:
M205 X4 Y4M205 X5 Y5All the way up to 9.
If your firmware uses junction deviation, use:
M205 J0.01M205 J0.02All the way up to J0.06.
Teaching Tech’s tutorial is really superb, and I highly recommend you follow it:
Conclusion
As you can see, acceleration and jerk are really powerful ways to fine-tune your 3D prints. My only recommendation is that you attempt to tune these after you’re confident your slicer settings are really dialed in.
For the acceleration and jerk/junction deviation, you modify the GCODE for every 5 layers. Since you are using layer heights of 0.2mm, these should be every 25 layers. After I sliced the model, I noticed that there were 150 layers total.