If you’re looking for Prusa’s new enclosure (not-so-uniquely named the “Prusa Enclosure”) good news, they’re for sale!
You can purchase a Prusa Enclosure directly from Prusa Research, here.
But if the price tag of the Prusa Enclosure is too high, yet you’d like to control your 3D printing environment, what do you do?
You already know that an enclosure allows for more consistent, higher-quality prints (otherwise you wouldn’t have Googled it).
So you still want to print props, costumes, tools, other practical items, and even prosthetics?
Then let’s go over how to build yourself a Prusa enclosure and touch on some of the benefits of having a 3D printing enclosure.
Benefits of a 3D Printing Enclosure
A 3D printing enclosure is a simple, box-like structure. It creates a more controlled environment when printing by blocking drafts and retaining heat. It also helps…
Reduce Noise
A good enclosure can make a noisy printer extra silent. This is useful as printers going at full speed ramp up the decibels. An enclosure keeps that noise away!
This can help users who print overnight get better quality sleep.
After all, who wants to hear a printer chugging away at 2 in the morning?
Improved Print Quality
The main benefit of an enclosure is that it improves the quality of prints.
It prevents drafts from cooling your part too quickly, which eliminates warping, shrinking, and stringing.
Any 3D printing enthusiast knows how tough those print errors are to deal with. Getting rid of them saves time, material, and effort.
Reduce Smell
Filament materials like ABS plastic produce smelly, even toxic fumes when heated. It’s unfortunate because that’s how FDM printers turn it into the final print.
While a safer option is working with PLA, an enclosure will help trap the smell. This saves you from any fumes and lets you print in peace.
Access to More Materials
You now have more filament options available. Your enclosure will keep smells in and keep the elements out.
You can work in ABS, PC, and PEEK without fear.
An enclosure lets you work with more sensitive materials. It gives you the ideal printing conditions and keeps you safe from harmful effects. You can let your prints run without worry.
Factors to Consider When Building An Enclosure For Prusa Printer
Here are a few factors to consider when building your enclosure for Prusa printers.
Safety
Safety is priority numero uno when it comes to printing enclosures. Your enclosure should preferably be fireproof in case of your printer overheating.
Accessibility
Your enclosure should give you access to the inside. You should be able to reach in and pull your finished prints.
It should also allow you to access your Prusa to make adjustments, change filaments, change nozzles, clean the bed, etc.
Price
One of the reasons we want to make our enclosure is that it would be cheaper than buying one.
Make sure to use affordable materials and plan your purchases!
Effort
Building your enclosure should be fun and within your skill range! You may want to add all kinds of extra features, but it’s best to keep it simple for your sake.
Convenience
A good enclosure should make your life easier!
Consider adding , temperature sensors, or other measuring devices. These will help you get the most out of your enclosure.
Steps to Build An Enclosure

Here are the steps to build the most simple yet comfortable home for your Prusa printer.
1. Take Your Measurements
Your enclosure should accept your printer. To ensure that happens, you’ll need to take the right measurements.
This will help you buy the right size of materials later.
Be sure to get the full height, including your filament mount. Measure length, including wires. And measure the width to include your monitor.
Move your hotend assembly and printer bed to their full X, Y, and Z axis ranges to be sure that you’ve accounted for bed movement, wires, etc.
Then, add a few inches on all sides.
It’s better to oversize than go undersize when it comes to enclosures. Don’t be afraid to build a bigger enclosure.
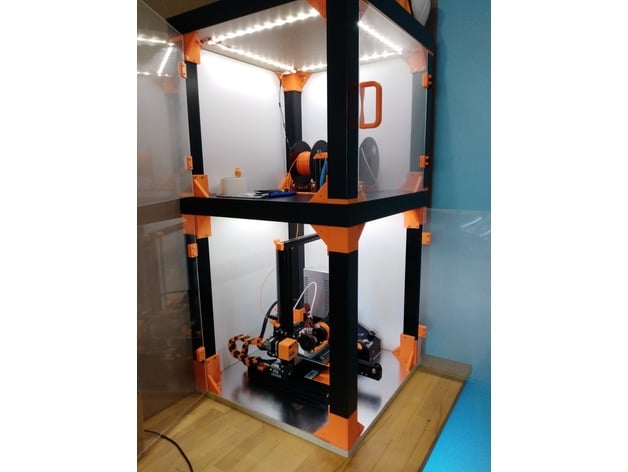
2. Find The Right Design
There are plenty of enclosure designs out there.
You can use one with a glass door or one encased in glass. It can be a simple box or have separate mounts for controls and filament.
You need to look for a design that works for you. Take the amount of space needed into account. Think if you want a stackable, modular design.
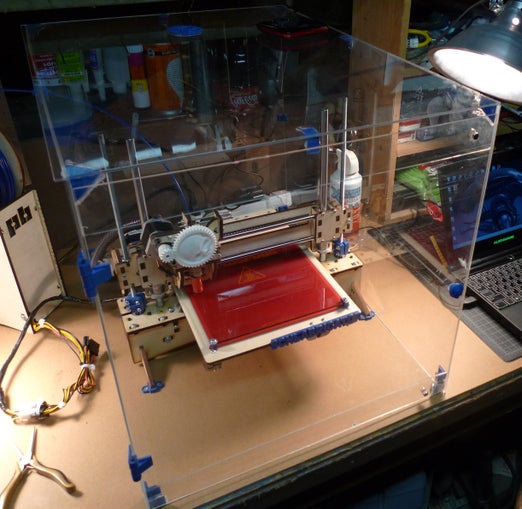
Here’s an inexpensive one we recommend (he was building it for an Ender 3, but with slight measurement adjustments it’ll work for a Prusa, too).
3. Gather Your Materials
This is what makes each enclosure different.
You can make the cheapest one out of cardboard. You can make it out of wood, plexiglass, or soundproof foam.
You can even take plastic containers and stack them!
You can get creative with the materials you build with. You’ll be fine as long as your choice is stable, insulated from heat, and long-lasting.
4. Build Your Frame
The frame is the basis of the whole design. Without it, your enclosure will collapse like a house of cards.
It could catch fire from being too close to the machine!
Your frame needs to be strong. Make sure to build it out of wood or metal for better results. It has to be stable, secure, and it should carry the weight of another assembly if needed.
It may take some welding or woodworking ability. But a solid frame can last longer than your printer itself. Build it right. Build it well, and reap the rewards.
5. Add Your Walls
With your frame all set to go, you can now add the walls of your enclosure. Find the right material. Cut it down to size and sand it down. Drill, hammer, or glue it into place.
You can reinforce it on the inside if necessary. If the materials are thin, you could add double layers. Pick the right material that’s affordable yet durable.
You can even layer the insides with soundproofing, heat-reflective sheeting, or anything to give you better performance.
Once your panels are secure, your enclosure is going to take shape.
6. Paint, Decorate and Add Your Doors
Now’s the time to paint your walls if you wish. This step is optional. You could even add decorations if you want. You don’t need to paint it (especially if you’re working with acrylic) but a little customization is always fun.
This is a chance to show off your creativity! Personalizing your enclosure lets you bond with your printer. You’ll want to care for it and use it more frequently.
After that, you can add the hinges and your glass door. It’s important to use a clear door, or doors that almost take up the whole wall. This lets you watch your machine.
7. Slide Your Printer In
With the basic assembly out of the way, now’s the time to set your printer in. Slide it in with care and take off your filament if you need to. Don’t be afraid to reassemble it.
If you measured your printer right, it should fit comfortably but have enough room for you to make manual repairs and adjustments. It should be comfortable to use.
8. Incorporate Your Electronics
You can incorporate your screen into the box with your Prusa printer. You can print an external control panel to access your screen inside the enclosure.
Be sure to take your power supply out and place it outside of your enclosure. Power supplies don’t like heat. They also put out a lot of heat on their own which can actually cause your enclosure to overheat. If your enclosure gets too hot it can start to hit the glass transition temperature of your filament, causing sagging or other problems with your print.
Aside from that, you can also incorporate your filament wheel on top of the box. This makes it easier and quicker to replace, like wheels on a racecar.
9. Add Your Accessories
You can now add accessories with the main assembly out of the way. You can mount LED strips to see your printer more clearly. You can add a camera to watch from afar.
You can add several accessories to make it easier to control your printer. With these, you can observe the internal temperature of your set-up, noise level, or print time.
10. Enjoy!
You’ve built and assembled your printer. Now’s the time to play around with it. Print a test print. Fiddle with your Mk3 or whatever Prusa you’re using. Have fun.
Your enclosure should render Prusa’s stealth mode obsolete. It should help you have a quieter, safer experience. The enclosure should produce cleaner prints and give you peace of mind.
Substitutes for Home-Made Enclosures

If you don’t want to make your enclosure, here are some ready-made options. They can be cheap or expensive, but they’ll get the job done.
1. Photography Studio Tent
An is straightforward to adapt into a print enclosure.
It’s simple. Slip your printer in, and voila. You now have an effective enclosure for only $30.
2. Creality Enclosure
This is a pricier option, but you can be sure it works.
While Creality made , it will serve your Prusas well. It provides excellent insulation for the best prints.
3. Ikea Lack Table
This option is the most popular enclosure in 3D printing.
It’s cheap and fits Prusa printers like a glove. You can even stack many layers to have more storage space.
Conclusion
All-in-all, a good enclosure can elevate your 3d printing game. It can help you get the most out of your Prusa printer.
It’ll keep you printing and help make the hobby even more enjoyable. So what are you waiting for? Your Prusa printer could use an enclosure.