PID Tune to your hotend will result in better quality prints so it’s worth the time to learn how to do it. It’s not that hard at all.
If you haven’t installed the Marlin Firmware on your 3D Printers Mainboard or don’t know what Marlin is check out my article; Beginner Guide to Marlin 1.1 3D Printer Firmware before trying this tutorial.
What is PID Tuning
Well, in short, PID Tuning ensures your HotEnd or Heated Bed stays at your desired temperature setting.
I’ll save you from the technical information and we’ll keep this guide simple and for beginners.
OK I’m ready to go what do I need?
We’ll be using Octoprint for this demonstration, but you can also use any slicer that has a terminal command window and is connected to your printer.
Pronterface a.k.a PrintRun is a free slicer that you can also use for this process.
Note: Some Mainboards do not support PID Tune Commands
Step 1 – PID Tune to your filament temp
You should already have an idea of what type of filament you want to tune on and the optimal temperature you print it at.
In this example, we will tune for standard PLA Filament at 200°C
Keep in mind you will want to PID Tune to different target temps based on what filament you will run in your 3D Printer.
Step 2 – Current Settings
First, get a baseline on what your 3D Printer is currently tuned at.
Open up your command terminal window in your slicer and connect to your 3D Printer.
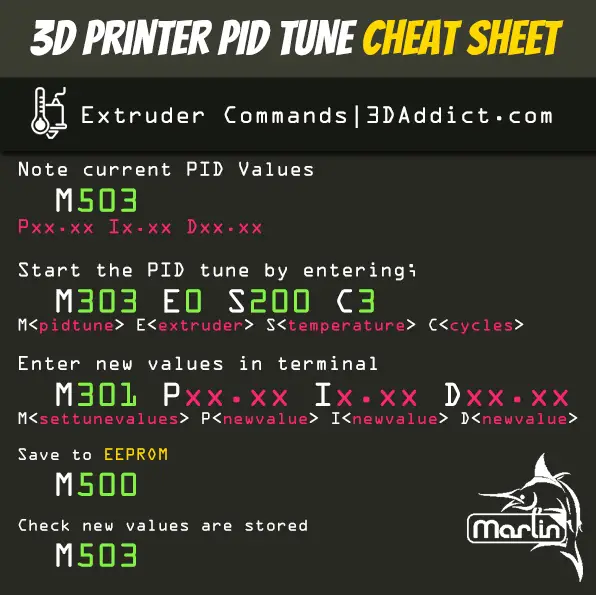
Once connected enter the following command to see what your current PID Tune settings are: M503
You’ll see a section PID Settings with a P, I and D set of values: M301 PXX.XX IX.XX DXX.XX

Write these down for safe keeping in case you need to revert back.
Step 3 – Start the PID Tune command
To start the auto PID Tune command enter M303 E0 S200 C3 where S= Target Temp.
Here is an explanation of the command: [M= Pid command E= Extruder S= Target Temp C= Cycles]
In this example, we will tune to 200 degrees for PLA Filament <M303 E0 S200 C3>
Here you can see what this process looks like;
Step 4 – Enter the new PID Tune values
So we started with M301 P22.20 I1.08 D114.00
and our new values are; Kp 40.63 Ki 5.98 Kd 69.06
This makes the new code to enter in the command line: M301 P40.63 I5.98 D69.06
One received then enter M500 to save the new values to the eeprom.
Enter M503 again to verify the new values are saved.
That’s it you have now completed a PID Tune on your 3d printer.
Check out this article on how to install Octoprint: https://3daddict.com/install-octoprint-3d-printer/
Also check out Astroprint which is also a great alternative: https://3daddict.com/octoprint-vs-astroprint-3d-printer/
Thanks for the easy to follow article, I was thinking I was gonna have to open Arduino and send new firmware over to set the correct PID values.
Thanks again
Thanks Stuarty!
Glad you found the info useful. Terminal commands are awesome!
Thank you for the easy to follow instructions. I’ve got a slightly out of tune hotend so this should help greatly. Thanks again.
WONDERFULL
took me three days to find this sorted know
thank you
Thank you sir! Every time I try to auto tune my hot end, it aborts after 10 seconds. I’m constantly getting a (too high) error, even when I set it at 200.
I’m new to 3d printing so I’m still learning. Any advice would be appreciated. Thanks!
Hey Rick,
That happened to me once and it turned out the connector of my thermistor was loose. It could be a variety of things like a locked EEPROM or something else depending on your printer board. If you are able to set the temp and have it hold there normally it might be a setting in the EEPROM you need to enable.