The Creality Ender 3 series of 3D printers is one of the best value options out there. However, that does not mean that it has no faults or it is a picture-perfect machine for 3D printing purposes. All filament printers have certain issues that need must be addressed if they are to work at their prime, day in day out.
Let’s look at a common issue that plagues the Ender 3: under extrusion, and talk about fixes.

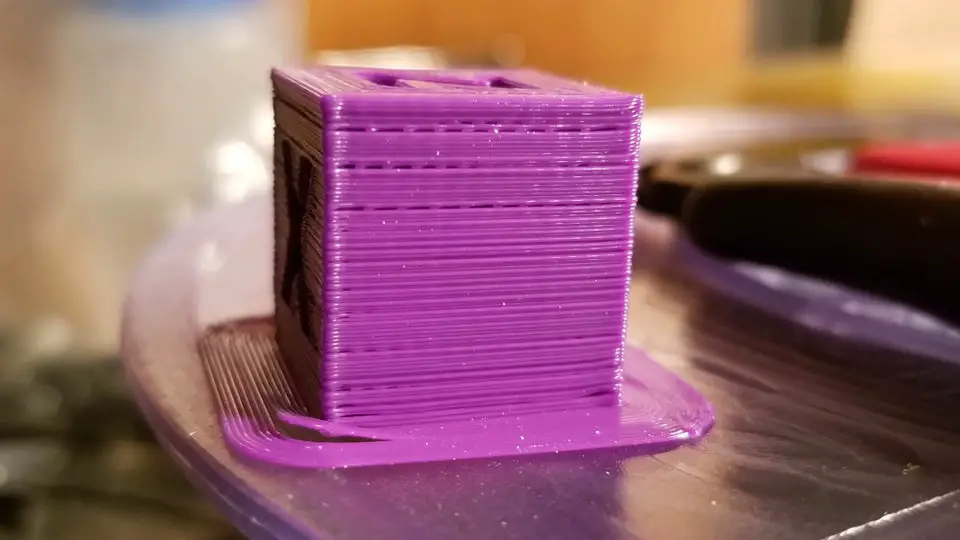
What Is Under Extrusion and What Does It Look Like?
There are many ways to determine if your machine is under extruding. But first, you will have to figure out what the term actually means as such.
Why Is My Printer Under Extruding?
Basically, under extrusion is said to occur whenever there is too little filament being extruded during a 3D printing process. This can result in missing layers, large gaps, insufficiently small layers, and sometimes even heaps of tiny little holes or dots in layers. Both print quality, as well as print strength, is heavily compromised whenever under extrusion occurs.
It can make a small statue of Skeletor look like a glabrous mess. Or it can puncture so many holes in your build that it would look like Swiss cheese!
Needless to say, such builds are utterly useless and you will have to spend a lot of time and effort scraping the mess of the hot end. Even if the build is acceptable quality and shape, it might look sharp and there may be many small lines running all over it.
Apart from everything else, it wastes a lot of filament and also increases the wear and tear on your Ender 3 machine.
How Do You Fix Under Extrusion?
However, it does not have to be this way at all. There are plenty of easy fixes that can get rid of all of your under extrusion 3D printing related problems, once and for all.
Increase Temperature and Decrease Print Speed
Many people new to the world of 3D printing tend to overlook both overall flow rate and printing temperature. It is very simple really. A higher flow rate means that there is more material coming out of the machine. Moreover, a higher temperature is also a causative factor for increased filament flow.
However, it is pertinent to note here that excessively high temperatures can also cause a lot of oozing and stringing related issues. Here, you will have to start by increasing the flow rate of the melted filament by 5 percent. At the same time, you have to also increase the total temperature by 3 °C.
If you get the desired results all well and good. Otherwise, keep increasing the temperature by one degree at a time. Albeit, that being said, you should keep your printing temperature no hotter than 10 °C over and above the usual temperature range of your Ender 3.
Clean and Adjust the Nozzle
This problem is sometimes caused by a partially clogged nozzle. If you are not sure if the filament is flowing freely through the stem, just extrude the filament and check and see if it comes out in a straight line or if it curled. The curling of the filament will automatically indicate a partially blocked nozzle on your Ender 3.
This issue is mainly caused by the ingress of foreign particles in the filament. Since these particles cannot be melted, they end up getting stuck in the tip.
Cleaning With the help of a Needle
In case the nozzle of your Ender 3 3D printer is clogged, you should consider pushing the material through the tip with the help of a fine needle. (Just be careful that you don’t hurt yourself or damage your machine.)
You might also consider using a cleaning filament to get rid of the clog. In fact, it is a good idea to always keep a supply of cleaning filament at hand to help ensure that such clogs don’t occur in the first place.
If this does not work, you will have to clear out the Bowden tube. You might even have to disassemble the whole extruder assemble, and later on, flush out all the residual plastic from each and every part with a heat gun and a metal pick.
The Cold Pull/Atomic Pull Technique
The cold pull method makes use of a long strand of filament and variable temperature changes in order to unclog or clean your Ender 3 nozzle. You can do this without going through the cumbersome bother of dismantling the whole thing.
This method for eliminating extrusion issues is also called the atomic pull. The procedure involves using an extra-long strand of filament and heating it till it has a molten tip. It is then used to pick up the bits and pieces of material, clogging the outlet of your 3D machine.
Once it has been inserted completely, you take it out by pulling it neatly and cleanly. It will hopefully take the clog and debris with it as it passes back out of the tip. Repeating the cold/atomic pull multiple times can help to fix various outlet related issues. In fact, this way you can easily get the job done without having to dismantle the extruder, or any other part of the machine.
And apart from that, you won’t have to risk injury or incorrect reassembly. This is why it is considered one of the best possible ways of dealing with extrusion issues.
Check Z Distance
This is another issue that is also related to the tip. I.e. Its distance from the print bed. If the printer’s print head is too close to its print bed, then the material will not be able to flow the way it is supposed to do so. If this is the case, you might be able to audibly hear extruder skipping noises. Apart from that, a thin first layer is also an indicator of this problem.
Replace the PTFE Tube
This is also an easily overlooked problem area. This is due to the fact that it is also very hard to recognize. Many 3D printer owners and users don’t even know that the cause of their extrusion related issues might be the PTFE tube.
Every 3D printing filament is unique in its own way and no two brands are manufactured the same. The usual tolerance levels are ±0.10-mm or so, and the odds are that even these might not be very consistent. Always remember that the tighter the tolerances of the PTFE tube, the higher the resistance to the filament’s path.
This will ultimately result in a lot of disturbance in the flow to the hot end, which in turn, might lead to under extrusion related problems.
In this case, the best way to check for any sort of PTFE tube resistance would be to try to extrude the filament on your own. If there is no resistance whatsoever, it will be easy to push the filament all the way through the tube easily enough. However, if you have to put in heaps of extra effort to push the filament into and all the way through the tube, then it means you have a problem and it is time to replace the PTFE tube.
Fix the Hot End of the Printer
If you have gone through all of the above steps and you are still facing an under extrusion problem, it might be time to fix the hot end of your machine. The PTFE tube should always sit flush with the nozzle at all times during the printing process. However, if there is a fault in the couplings or due to poor quality control (QC) you might have to contend with a gap in-between the tube and its nozzle.
The filament will ooze out of and eventually accumulate in this gap instead of flowing straight into the nozzle. With the passage of time, it will lead to a reduction in the flow of the filament, and eventually, the PTFE tube might end up becoming completely blocked.
You will have to use a washer to help ensure that the tube always sits flush with the nozzle. Alternatively, it is also a good idea to install better couplings and then proceed to reassemble the hot end.
Calibrate the Extruder
Extruder calibration is very important to avoid ender extrusion and other 3D printing problems. A properly calculated extruder will push exactly the right amount of material all the way through the hot end during the printing process.
If it is not working at its optimum capacity there will be gaps between layers or the layers might become weak as well. There will be adhesion and warping related problems to contend with too. This is what you can do to avoid all of this:
Load the Filament Properly
Preheat the nozzle to the required temperature necessary for your filament. Take care to remove all extra material from the nozzle and loading areas.
Connect your Machine to the Computer
You can do the needful either with an USB drive or Wi-Fi as per your printer’s specifications. Once done, you should open up and connect the requisite slicer software that will enable you to send single-line commands to your printer.
Mark the Filament and Commence Extruding
Use 100 mm of filament and send it through the hot end to start calibrating the extruder. You should do it over the course of at least 60 seconds to avoid problems with filament tension in the hot end, lest it skews the results.
Measure the Results
Once done, the printer should ideally have extruded exactly 100 mm of the filament you put in it. To check this, you will have to measure from the extruder all the way to the original mark you had made on the filament reel.
If the measurement comes to 20 mm, your extruder is properly calibrated. If it is more than that, your machine needs calibration.
Replace the Stock Extruder by Ones That You Can Buy or Print
When all else fails, simply purchase a new extruder from Amazon and replace it by getting rid of the stock one. An all-metal one can do the job quite well. You can also use the E3D Titan Aero Extruder. The extremely tight filament path will make sure that this upgrade is the perfect solution for all under extrusion related problems.
You can also 3D print an extruder by checking out the Ender 3 Extruders here.