Most of the time when we slice a 3D print, we only care about the infill density, and hardly give a thought to the infill pattern. With the latest releases of Cura, there are a lot of different infill patterns to choose from, which got us thinking: what’s the best infill pattern?
As you might imagine, each particular infill pattern has its own strengths and weaknesses(pun intended). Some patterns are good for everyday printing, and other patterns do better in particular applications.
So which infill pattern should you use, and when? Let’s take a look.
What’s the best infill pattern?
The best infill pattern is the default grid infill pattern in Cura. The grid is a great middle ground between strength, speed, and weight-saving, so if you don’t want to fiddle too much and just want to 3D print, the grid pattern(also known as rectilinear pattern) works fine.
Why is infill so important?
Infill is a really neat function of 3D printing. 3D prints don’t need to be solid all the way through. Instead, 3D prints can be hollow to a certain extent. The 3D printer lays first lays down a perimeter, or shell, and the fills the space between the shell with patterns.
An infill setting of 0% will yield a hollow print, and an infill setting of 100% will yield a fully solid print.
We’ve discussed at length how much infill you need in this post here.
How many types of infill patterns are there?
The latest version of Cura supports 13 types of infill. These infill patterns can actually be grouped into categories, so to simplify things, we’ll group them and discuss their advantages and disadvantages.
Regular 3D prints: these require medium strength, and will use infill patterns like grid, tri-hexagon, and triangles
Models and figurines: these require minial strength, and will use infill patterns like lines or zig-zag
Functional 3D prints: these require the most strength, and will use infill patterns like cubic, cubic subdivision, octet, quarter cubic, gyroid
Flexible 3D prints: these require a combination of strength and flexibility, and will use patterns like concentric, cross, and cross 3D
What infill is best for regular 3D prints?
Regular 3D prints need a moderate amount of strength, so you don’t need to go too crazy with infill patterns. You can use an infill density of anywhere between 10% to 40%.
Use 10% for prints where you don’t really care about strength, and for parts that may come under a bit more stress, use a higher percentage.
Just bear in mind that the more you increase the infill density, the more time it will take for the 3D print to complete. It won’t be as much as double, but in some cases, the time can increase by up to 25%.
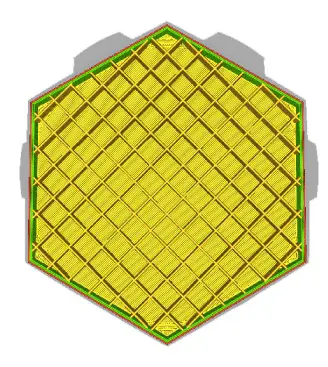
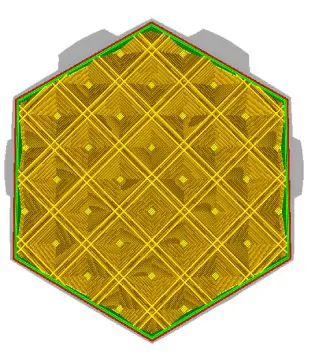
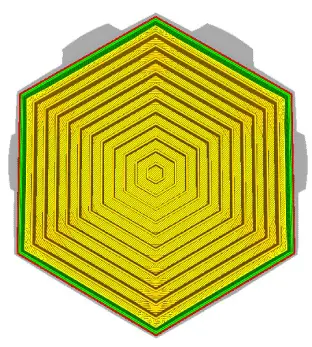
Grid infill
All images credit: Ultimaker
The grid pattern is the simplest pattern, as it just lays down a simple grid with lines going perpendicularly. This is a 2D pattern, so the infill will be the same all the way through the print. Grid prints very quickly.
Tri-hexagon infill
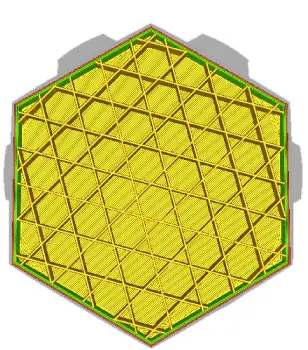
The tri-hexagon infill is really interesting, as it is made of 6-pointed triangles that contain one hexagon at the center and triangles at the corners.
Tri-hexagon infill is great for parts that will come under stress from a force perpendicular to the face of the object. This pattern is good for boxy objects that have large and limited walls.
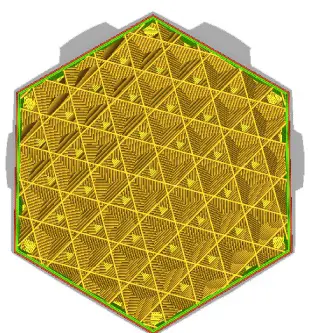
Triangle infill
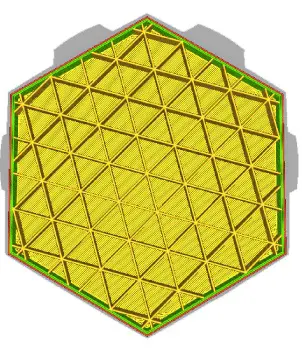
Triangle infill makes lots of little triangles that stack up to make hexagons. Hexagons are really cool because they are able to withstand equal amounts of force from all directions, and use up comparatively less material than other shapes. That’s why honeycombs are also hexagons!
What infill is best for models and figurines?
Models, figurines, and decorative pieces don’t need lots of infill because they’re not going to come under any stress or force. With these models, you can get away with really small infill percentages of 5% to 15%.
Since models and figurines have lots of outer detail, you want to try and use the fastest infill possible to cut down the inner print time. For this reason, use zig-zag or lines infill.
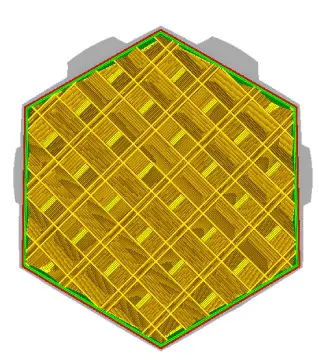
Zig-zag and lines infill
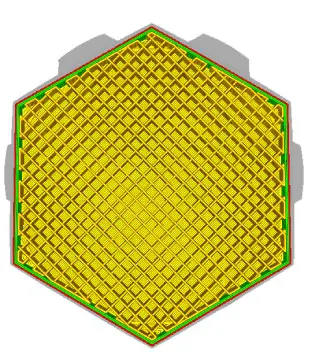
These infill patterns make a 2D grid where every layer has just one axis. For example, assuming you have 2 bottom layers, layer 3 will have lines going from say the right to the left, and layer 4 will have lines going from the left to the right.
Zig-zag is essentially the same as lines, except zig-zag is a continuous line, whereas lines infill consists of separate strands of plastic.
Both patterns are very similar, which is why we’ve considered them as a single pattern.
Models 3D printed with this infill pattern will turn out quickly, so it’s also a good option for rapid prototyping and displays.
What infill is best for functional prints?
Functional prints that will come under loads and stress need to be strong. For these prints, use an infill density of 50% of more. You’ll also need to choose an infill pattern that provides strength in all directions.
With some of these infill patterns, you can actually use less density and still get a decent amount of strength. You can also use them without a top layer to produce a really neat aesthetic effect.
Cubic
Cubic infill consists of stacked and tilted cubes. This infill pattern is best observed by cutting a model in half and viewing the cross section rather than just looking at it from the top!
Cubic subdivision
Cubic subdivision is very similar to cubic, except it uses less material to print. It’s worth noting that less material is quite subjective and you’ll probably save a small percentage of filament. Still, it adds up over time.
Octet
Octet infill uses the same principle as cubic, except that instead of cubes, pyramid shapes are stacked one on top of the other.
Quarter cubic
Quarter cubic is similar to octet, except the pyramids shift halfway.
Gyroid
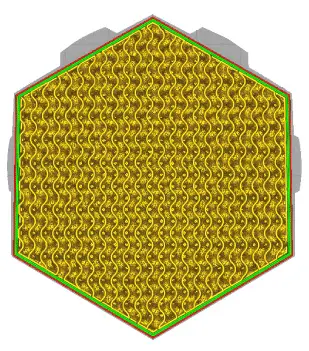
Gyroid infill is unique to Cura and is made of 3D wave-like shapes. It has the advantage of using less material and providing a lot of strength, but it takes comparatively longer to print than other patterns. We’ve written an in-depth guide about gyroid infill which you can find here.
What infill is best for flexible prints?
Finally, let’s talk about flexible prints. Here, you want strength in a way that does not compromise flexibility. Here, you can vary the infill density from 1-100% depending on how flexible the print must be.
Flexible prints work best with patterns like concentric, cross, and cross 3D.
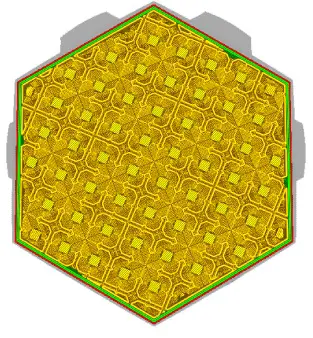
Concentric
Concentric infill makes infill like a ripple effect inside the print by following the shape of the walls of the print and getting smaller and smaller until it hits the center.
Cross
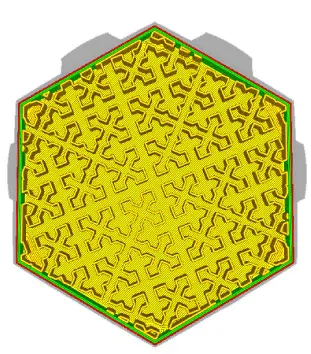
Cross infill makes elaborately shaped crosses in the infill of your 3D print. There’s a lot more space between the crosses than there is in concentric infill.
Cross 3D
Cross 3D is similar to cross, except the lines shift ever so slightly on every layer, producing inclines. There’s a lot of space between the infill here, too, so you get lots of flexibility.
The key to these patterns is that there is a lot of space between the infill and the infill lines don’t restrict one another, allowing the whole print to bend and twist.
Infill line direction
Infill line direction is an interesting setting to play around with. The default setting is 45 degrees, so both axes will work together. In some cases, you can skew the infill line direction towards one direction to give more strength to the model in a particular direction.
Gradient Infill and Gradual Infill
The default settings in Cura will result in the infill being the same throughout the entire part. In some cases, you may wish to use a setting called gradient infill to increase the infill nearer to the walls and decrease the infill closer to the center. Having thicker infill at the walls will mean you’ll effectively have thicker walls and a stronger part.
You can follow this guide to set up gradient infill in Cura.
Gradual infill is similar to gradient infill, except that it works on the Z axis. The infill can change as each layer progresses. This is a good way to provide more strength to a delicate part of the print and save material on the wider parts below.
Conclusion
If you’re really particular about your 3D prints and want to optimize them as much as possible, then using a specific infill pattern for your use case can help you make your 3D prints that much better.
The main component of successful 3D printing is experimentation and optimization, so feel free to use varying infill percentages and patterns to see what kind of results you get.