The Anet A8 is arguably one of the most well-known unassembled printers available to professionals and hobbyists alike.
It’s extremely flexibility is one of the main reasons due to which this printer has such a huge fan following and community behind it. In case of a problem, you have simply to tap into this extended network and viola; all your issues will be resolved.
Since it is priced under the $200 bracket, many hobbyists and do it yourself (DIY) enthusiasts use this as their very first printer. As a matter of fact, the very low prices and its inherent hackability also make it a really attractive choice for many first time users.
Add to that the printer’s compatibility with a veritable plethora of materials. Since all of this is available on a shoestring budget, no wonder the world is swooning over this great machine.
The Chinese Anet A8 can also be seen as the first trailblazing and inexpensive printer that has taken the world by storm. It would not be wrong to assert that the Anet A8 3D printer kit bought the world of 3D printing to the masses.
It successfully ushered in an entirely new era of widespread affordability with regard to FDM printing technology since its very inception.
Here it would be important to point out that this is essentially a tinkerer’s dream machine. This is also the primary reason why it is shipped unassembled. You can easily create your very own dream unit, customized to your own specs. However, be warned, building a complete 3D printer from scratch can be quite a bit of a challenge.
Pros
- This is an extremely affordable 3D printer kit
- Completely modifiable as per your own requirements
- A huge amount of 3D printable enhancements are easily available
- An amazing way to start and learn the art and science of FDM 3D printing
- It is possible to improve functionality with each individual print and tweak
- A highly capable 3D printer for its price
- A really good fun project to put together with your family
Cons
- The assembly instructions leave a lot to be desired
- It is quite difficult to both build and use without adequate knowledge of 3D printing
- A very sharp and steep learning curve
- The user interface of this printer is not very practical
- It takes a lot of time and patience to get a picture-perfect print
- Manual calibration can also turn out to be a very frustrating experience
- It is not an aesthetically pleasing design by any means
Anet A8 Review: Our thoughts in 2020
The first sight after unboxing the package was not very appealing. It was just a bunch of carefully packed components. However, we soon found out that even though it was a very challenging task to build this 3D printer from the ground up; once the task was done, it cranked out awesome builds.
However, here you will have to be very patient and find the time to not only assemble but also optimize this unique 3D printer.
Based on our own personal experience and judgment, we can confidently assert that the Anet A8 is probably one of the very best 3D printers out there. This holds particularly true for highly determined beginners, not to mention enthusiasts looking to print 3D objects on a very small budget.
This video below takes you through the unboxing:
Key Features of the Anet A8
Let us take a more in-depth look at this great machine and see how it fares against its competing 3D printers.
This machine offers a comprehensive learning experience for a 3D printer kit. This unit features an elegant black laser-cut full acrylic frame that boasts of a 220 x 220 x 240mm printing volume.
It also features the following:
- Excellent all-metal pulleys for both enhanced functionality and top-notch performance
- Super quick-release feed gears for efficient and fast filament extrusion
- Stainless steel bearings, rail rods, gears and connectors
It offers near seamless PC compatibility with a near unlimited options list. As of now, this machine works with Windows XP, Windows 10, Windows 7, Windows 8, as well as Mac and Linux operating systems.
Apart from that, its SD card option makes sure that you will never run out of designs.
Related: How to build a 3D printer from a kit
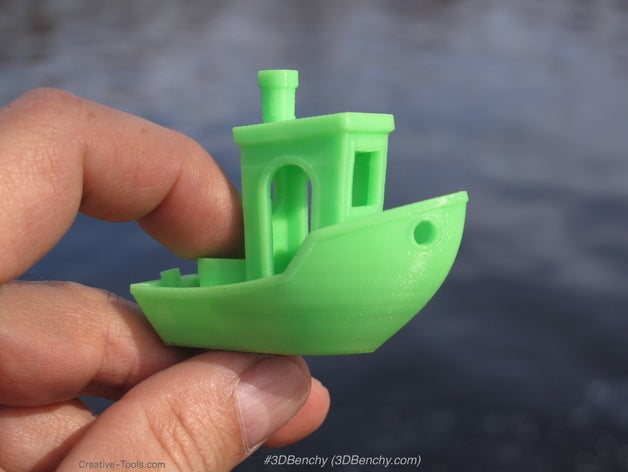
Print Speed and Performance
This printer can reach nominal print speeds of up to 100mm/s. However, there is no point to speed if it compromises quality. Keeping this in mind, we decided to run a few prints off the machine, after making sure that it had been thoroughly calibrated.
Apart from that, we also made sure that were no belts or wires loose enough to affect the quality of the print. Yes, it will take a bit of time and effort to create a really great print, but once you get your bearings right, we are sure that you will be astonished by the quality of your 3D prints.
The usual benchy test is testimony to the clarity and potential of this machine:
Materials
This is another area where the Anet A8’s star shines a whole lot better than its competitors. This is arguably one of the most flexible machines available today as far as printing materials are concerned.
This printer is fully compatible with a very large number of materials, such as PLA, ABS, Woodfill, PVA, Nylon PP, and many others.
Nozzle Diameter
The nozzle diameter of 0.4mm is on par for the course and it is the standard for most printers in this price range. This is good enough for most tasks that a printer of this caliber might be used to perform.
Positioning Accuracy
The positioning accuracy for the XY-axis is 0.012mm and the corresponding accuracy for the Z-axis is 0.004mm. This is better than many other 3D printers out there.
Structure Material
The frame material is acrylic. While not quite as sturdy as aluminum, it is certainly strong enough to get the job done not just a few times but literally thousands of times. And it can definitely take a licking and keep on ticking.
Unboxing and Assembling the Anet A8
The Anet A8 is as DIY as a 3D printer kit can get. Once you open the package, you will find three Styrofoam trays, each with its own set of components. Together, they will form part of the complicated puzzle that is the Anet A8 printer kit.
The different parts and small components are grouped together and every part is clearly labeled. Furthermore, the surface area of all of the more fragile pieces is well protected with the help of thick sticky tape.
While this does protect the pieces from scratches, the removal of all those yards of tape can, unfortunately, take a lot of your precious time.
Apart from the main components, the 3D printer kit also comes equipped with a really vast array of assorted screws and nuts, and they are all grouped together and also labeled properly.
The same goes for the mechanical parts such as the motors, extruder, bearings, the mainboard, and the central power supply. All of these vital components are also safely tucked away while being properly branded.
However, there was one glaring omission. There is no physical assembly manual as such. You will have to use the USB stick that comes with the machine to assemble it properly. If you don’t have a laptop handy, or if your PC setup is not in your workshop, you are out of luck.
Assembly
If you like to follow video instructions, it is all well and good. However, many people would find them to be a bit lackluster, at the very least. There is a definite lack of clarity to the whole process. For instance, the video guide does not take off the stickers from any of the components. Once the machine is assembled, there is little you can do about it, unless you want to do it all over again.
Our Thoughts on the Assembly Procedure
Apart from that, certain sections of the whole 30+ step assembly process are somewhat vague and you would have to wing it along. For example, the basic assembly of the y-axis is explained lucidly enough, but the instructions don’t show how you will be able to house the motor assembly in line with the connector pins.
Luckily, you won’t have to tear your hair in frustration because there are plenty of YouTube videos online. They will show you how to assemble your Anet A8.
Overall Build Quality
This printer has a sleek and minimalistic design that can help you to fine-tune its performance. Basically, the open-ended nature of this style will automatically allow you to tweak this machine to your heart’s content with the help of easy to follow online instructions. In fact, you can dig into each and every crevice of this 3D printer.
For example, in case there is a clog jamming up the works, you can simply take apart the extruder arm and clean up the whole works.
Apart from that, we found out that the 3D printed fan was not up to specs and did not fit as well as it should on the extruder. However, Thingiverse has some excellent fan mods available for downloading and printing purposes. We will discuss this in more detail later.
As for the user interface, the LCD screen was adequate enough, but seemed to lack in practicality. Yes, its features are not quite in the same league as the iconic Prusa i3, but good enough to get the job done.
Various Upgrades and Mods
This is a fully customizable machine with heaps of upgrades and mods available. If you can’t find them commercially, you can simply make your own. After all, you own a 3D printer!
Fan Duct
As mentioned earlier, the stock fan available with the printer kit is a bit of a hit or miss affair. However, you may create your very own fully customized one.
This vital modification will help distribute the ambient air to the nozzle all around it in a 360-degree angle. Furthermore, this unique enhancement will help you to achieve some of the very best quality prints possible. You just have to make sure to print it right.
MOSFET
The Anet A8 community generally recommends mounting a MOSFET device onto your machine. This additional component is very important for everyone who prioritizes fire safety.
It will not only reduce fire hazard related risks but also provide excellent voltage to your printer’s motors. This upgrade works by regulating the very high workload that the extruder and the heated bed create upon the mainboard.
Apart from safety, this upgrade also provides an element of some performance-enhancing benefits. It will enable the printer’s owner to mount a secondary power supply unit (PSU) on their machine. This will drastically reduce the healing period of your unit.
Extruder
It is quite possible to improve the overall printing performance through the simple expedient of equipping your Anet A8 3D printer with a much better extruder.
For example, the E3D Titan Extruder is a really popular addition to your printer kit. The very lightweight construction easily increases maximum torque and reduces nozzle clogging. Ultimately, all of this provides a higher resolution print quality.
Auto Level Sensor
This is another upgrade worthy of your 3D printing kit. Manual leveling can be a very frustrating job and it can take the whole joy and fun out of 3D printing. However, the process can be easily simplified with the help of a state of the art auto-level sensor.
There are many different auto-leveling options available for your Anet A8 and you will truly be spoiled for choices, once you decide to get one.
Related
3D Printable Upgrades
Barring the fan duct, all of the above parts have to be commercially purchased either online or offline. However, there are still many 3D printable upgrades and mods that can be used to tweak your printer so that it performs better than ever before. You can store any number of designs on your unit’s SD card.
Filament Guide
This simple and easy to print A8 upgrade can help make life a whole lot easier when it comes to printing your favorite 3D objects. This is because the stock Anet A8 lacks the designated guidance system or route for your filament.
Once you basically 3D print this filament guide on your printer and mount it on top of your frame, you will see that the filament flow will improve and it will extrude without hindrance.
Extruder Button
This is a one of the most basic yet necessary upgrade on this list. Your freshly printed extruder button is a very convenient means of increasing your comfort. It will save you from pressing down the stock extruder screw, all the time.
In fact, you can 3D print the little extruder button within a few moments, at most. Once you fit this printable upgrade to the extruder, you can kiss the callouses on your fingers, goodbye.
X-Axis Cable Chain
The cabling and wiring on a DIY 3D printer can get a bit messy. However, this 3D printable X-axis cable chain is just the thing for you, since it will be a great help in tidying up all the loose cables that you need to route.
This upgrade can effectively eliminate the whole mess of wires from spilling all over the 3D printer. Apart from that, it will also ensure wire strain relief too. Once installed, you can count on having one of the neatest and coolest DIY printers around.
Communities and YouTube Channels
This is probably one of the strongest points of the Anet A8. Since it is a DIY printer, there are plenty of tinkerers and hobbyists out there who want you to enjoy the benefits of this machine to the optimum.
Multiple communities have sprung up as well as YouTube channels. The huge amount of online material available will help you to ensure that your machine is always at its very best.
If you have any problems regarding assembly or subsequent operation, you can always ask the experts at hand for help.
Apart from that, there are plenty of videos available that will help even a newbie to enjoy any number of Anet A8 3D printers and utilize it to the very best of their capabilities.
Related
Conclusion
We would like to conclude this review by stating that the 3D printer Anet A8 is not an absolutely flawless printer. Yes, it is not as good as the Prusa i3 for instance, but it is an excellent starting point in its own right.
The low price point certainly makes it a really viable option for anyone looking to start this hobby on a budget. Bed leveling of the print bed is an issue, but it can be resolved with a few after-market upgrades.
However, it is pertinent to note that this is primarily a project 3D printer. This is why it will always require a lot of upgrades and tweaks to optimize performance.
In a nutshell, if you are in the market for a really affordable 3D printer kit to get you into the 3D printing game, the Anet A8 3D Printer is the right tool for the job. Even nearly 4 years after its release, it still remains the affordable 3D printer kit to beat.