Stringing is a very common issue in 3D printing and it can make your 3D prints look really messy. The good news is that stringing is usually very easy to fix. Let’s take a look at how to fix your 3D print stringing issues.
In order to fix stringing, it’s useful to understand why it happens in the first place.
Stringing is characterized by small wispy bits of filament that appear in places in your model where there should be a gap. Models with large gaps between parts tend to experience more stringing than others.
Stringing occurs when filament leaks through your nozzle in places where it shouldn’t. This usually happens during travel moves. A travel move is when the toolhead moves from one point to another but without extruding any filament.
Suppose you were 3D printing a model of Stonehenge. There would be a lot of travel moves in this print between each of the stones. Poorly configured settings can result in a lot of stringing between the stones.
Generally speaking, filaments that require higher temperatures to print(like PETG) are more prone to stringing, but it can happen with PLA and flexible filaments, too.
The easiest way to fix stringing is by reducing your 3D printing temperature.
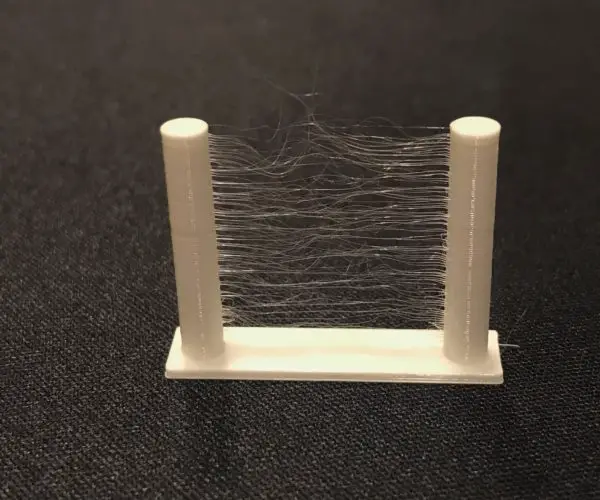
Image credit: PrusaPrinters Forum
8 Ways To Fix Stringing
Reduce your printing temperature
3D printer filaments have a very wide range of temperatures at which they can work. More often than not, we end up setting the printing temperature much higher than what is necessary.
There’s a very wide range of temperatures for each filament, and every manufacturer also lists their recommended temperature ranges on the packaging.
For example, PLA can print at anywhere between 180 to 220 degrees C. 40 degrees is a very wide range! If you’ve set your printing temperature higher than what it needs to be, it can cause the filament to liquefy more and ooze out of the nozzle.
If your current printing temperature is much higher than what the minimum recommendation is from your filament’s manufacturer, try reducing the temperature in decrements of 5 degrees until you see an improvement in your prints.
Don’t go too low, though, as that can cause the filament to not melt enough and you’ll end up with under-extrusion.
If you’re breaking out a brand new spool of filament, try to set the temperature 10 degrees higher than the minimum recommended temperature and see how that goes.
Remember, 3D printing is a lot of experimenting, so it will take a little bit of time and effort to dial it in. But it will be worth the wait!
You can also try printing a temperature tower to see which temperature works best for your filament.
Note: Once you find a filament brand that you like, try to stick to it. This way, you won’t have to keep changing your settings.
Enable retraction
If temperature did not solve the issue, then the next thing to tweak is retraction. Most modern slicers have retraction enabled by default, but you still may need to adjust the parameters a little.
When your 3D printer is extruding material, the extruder gear pushes the filament outwards. However, the extruder gear can also turn the other way and pull filament back.
This function is called retraction.
When filament reaches the hot end, it begins to melt. The very tip are of the filament is the melt zone, and the pressure put on it by the extruder determines the layer height it comes out in.
When the melt zone is right at the nozzle, there’s a chance that filament can drip out even when it’s not supposed to. As you read above, this usually happens in travel moves.
Retraction pulls the filament backwards to bring the melt zone deeper inside the hot end. This way, less(preferably none) filament drips out.
First, head into your slicer settings and make sure that retraction is enabled.
There are two main settings that you have to adjust in retraction.
Retraction distance
Retraction distance is the most important setting, as it determines how far back the filament should be pulled. If you don’t pull the filament far enough, you’ll continue to experience stringing.
However, if you pull the filament too far back, there may not be enough filament in the nozzle by the time it’s actually supposed to come out.
There is no one-size-fits-all in retraction distance, so you’ll need to start with a benchmark and then adjust up and down as necessary.
As a general rule, direct-drive extruders require less retraction than Bowden setups.
For direct-drive extruders, use retraction distances of 0.5 to 1 mm.
For Bowden extruders, use retraction distances of 2 to 4 mm.
The best way to find out is to start at the lower value and increase as necessary.
Retraction speed
Retraction speed is how fast the extruder will pull the filament back. Use retraction speeds of 40-60 mm/s on direct-drive extruders and 30-50 mm/s on Bowden extruders.
Enabling retraction and configuring it properly should solve your 3D print stringing issues right away. Retraction is the one setting that is specifically designed to prevent this problem!
Raise travel speed
Since the oozing happens during travel moves, one way to reduce oozing is to increase the travel speed. This will allow less time for filament to leak out of the nozzle during travel.
Raising travel speed is not a home run solution, though, since there will be situations where the distance between the two points will not be large enough for the toolhead to reach top speed!
Learn more about jerk and acceleration here.
Enable wipe/coast
If you use Simplify3D, you can use the wipe/coast settings to help further reduce any stringing. These are extra measures the 3D printer will take to make sure there is no extra filament in the nozzle between travel moves.
Enable Combing
Combing is a very useful setting in Cura that recalculates the travel path to make sure travel moves outside the object are as few as possible. This will result in a lot of extra travel, but any stringing or oozing will be hidden inside the model.
Clean the nozzle well
As you use your printer more and more, tiny bits of dirt and filament will begin to accumulate inside the nozzle. These little particles can ooze out along with your filament and stick to the object you are 3D printing.
If you begin to experience stringing even though your temperature and retraction settings are well-tuned, you may need to clean the nozzle.
There are plenty of nozzle cleaning kits available on Amazon.com. If you don’t have one, it is a critical piece of equipment to have in your 3D printing toolkit.
To clean the nozzle, heat up the nozzle to make any materials stuck inside it more pliable.
Then insert the cleaning needle in your nozzle and do an in-out motion a few times. Every time you pull the needle out, you should see some residue come out as well.
Once the residue is out, extrude some filament so that it can pull out any loose particles still in the nozzle.
To maintain your 3D printer well, it’s a good idea to use a brush with strong nylon bristles and scrub the nozzle after every 3D print.
Replace the nozzle
If you don’t clean your nozzle for a long time, it may reach a point of no return after which the only solution is to replace it altogether.
Replacing nozzles is a fairly easy task:
- Raise the gantry to a comfortable distance above the print bed
- Use one pair of pliers to grip the hot end, and use a torque wrench or a hex nut to remove the old nozzle. If there’s too much plastic holding the old nozzle stuck, you may need to raise the temperature of the hot end to soften up the plastic.
- Remove the old nozzle and make sure the threads and heat break are clean. If they’re not, now is the time to clean them!
- Screw on the new nozzle
- Enjoy your clean new prints!
Use high quality, clean, dry filament
Poor quality filament will not perform well even if you have the best settings in the world. Since the filament is really the main factor in 3D printing, you must make sure you are using good filament.
There’s plenty of cheap filament available out there, but in order to save a couple of dollars on a spool, you may end up using more filament due to failed prints!
It’s always a good idea to pick up name-brand filament from reputed manufacturers. These guys have highly standardized and tested processes for making their filaments.
Keep your filaments dry
PLA is highly hygrophobic, so it will absorb any moisture around it. Store your filaments in an airtight box and throw some silica gel packets in there for good measure.
Once PLA absorbs moisture, all the chemistry gets thrown off by a bit, so your printing temperature is no longer reliable.
Moisture will definitely result in zits and blobs, which can be even more unsightly than stringing!
Learn about the best filament dryers here.
Keep your filaments clean
Dusty and other tiny particles can stick to your filament before it goes into the nozzle, and that can also cause problems with your 3D prints.
The best way to clean filaments is to 3D print a little filament cleaner. It’s a small plastic box that you put a sponge in, and the filament passes through it just before going into the extruder.
Conclusion
Stringing can seem like a frustrating problem to deal with, but there are a number of solutions you can try. If you’re having trouble with your Ender 3 stringing, we have another article about that specific printer that you can check out here.