Extruder Calibration could be one of the most important factors for your 3D Printer and the quality of your parts. This is often overlooked especially with pre-assembled printers. There are some key factors to concentrate on when finding your optimal steps/mm settings for your extruder. Once you have found the perfect number, the next step is to dial in your extrusion multiple. This article will cover these steps and guide you through the process.
Extruder Calibration Steps per mm
The first step is to program your steps per mm setting for your extruder. In this example, we’ll be using marlin firmware and pronterface. Pronterface now called printrun is a free 3D printing host software suite which talks to your printer. For this step you will need to connect your computer to your 3D Printer. Alternatively you can also use Octoprint or Astroprint to do this semi-remotely.
Step 1: Find your current steps/mm of your extruder
To do this enter M501 in the command terminal window line.

Note the current steps/mm value seen after the EXXX.XX
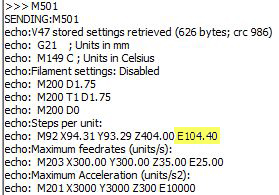
In this example our extruder steps/mm value is 104.40 (save your number, we will use this later.)
Step 2: Setup Pronterface or Slicer
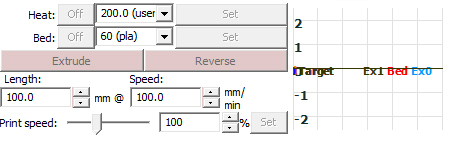
We will be using PLA Filament and Extruding 100mm for this test. Make sure to test the speed rate that your extruder is pushing out the filament. The filament should be coming out nice and slow. If it extrudes too fast it could skip steps and make the calibration be off target. Do a couple of tests and adjust the Speed mm/min to find a nice and slow extrusion rate.
Step 3: Marking the Filament
Mark two lines from the extruder where the filament enters using a ruler; one line at 100mm length and then another line just above at 120mm. We make the second line 20mm higher in case we over extrude and loose the first line.
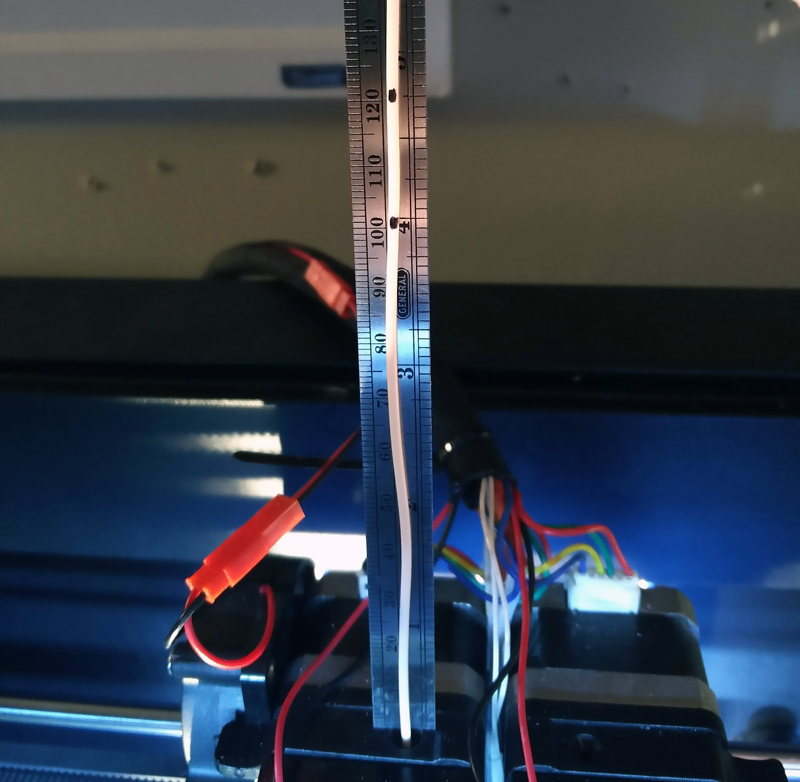

Okay ready, set, extrude!
Press the extruder button and watch the 3d printer extrude. Once Extruder Calibration is finished, measure the distance to the 100m or 120mm line depending on what’s visible.
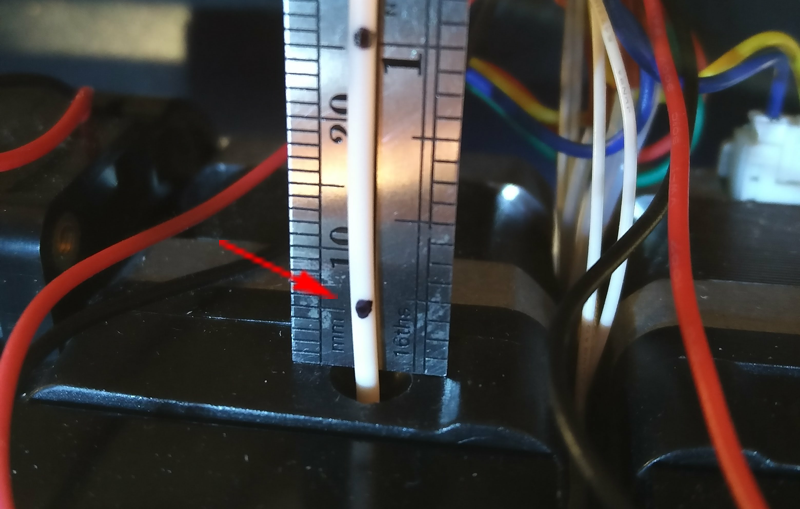
Note the length that has been extruded. In this example our extrusion length was 95mm.
The Equation…
To calculate the Extruder Calibration steps per mm from the extrusion length you can use this equation;
steps/mm × 100 mm = X then X / extruded distance = new steps/mm value
so in our example 104.40 x 100 = 10440 then 10440 / 95 = 109.89 <- new steps/mm value
Use this handy calculator to enter your data.
Measured amount of filament extruded:
mm
Expected amount of filament extruded (if 100mm, don’t change):
mm
New estep value: –
You did it! You have your new steps per mm Value.
Firmware and EEPROM Entry
Now you need to enter this new value into the 3D Printers firmware for the Extruder Calibration.
In the pronterface command terminal enter M92 EXXX.XX where X is your new steps/mm value

Now enter M500 to save the new extruder steps setting to the 3D Printers EEPROM.
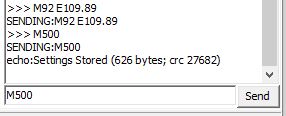
Lastly, check your new settings are saved using the M501 command.

That’s it you have now calibrated your extruder steps/mm for your 3D Printer.
Calibrating Extrusion Multiplier
Most 3D Printer Slicer software features an extrusion multiplier setting. This setting is an easy way to control the flow rate of extrusion.
Use your favorite calibration cube or download this 25mm cube: Cube25mm.STL

Load the calibration cube into your slicer and we’ll need to adjust a few settings. For this example, we will use Simplify3D.
Layer Settings
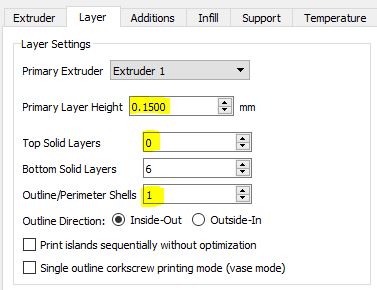
Top Layers: 0
Outline/Perimeter Shells: 1
In the image above it shows we will use a layer height of 0.1500 (150 microns), this is important for the calibration. Top Layers is set to 0 because we want the cube to be open on the top so we can measure. Outer Perimeter Shells is 1 so the extruder lays down a single wall line for us to measure.
Note: Set the infill percentage to 0 as we want the inside to be hollow (like Vase Mode).
Extruder Settings
In this example, we will be using a 0.4mm nozzle size.
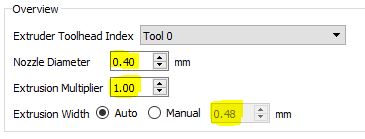
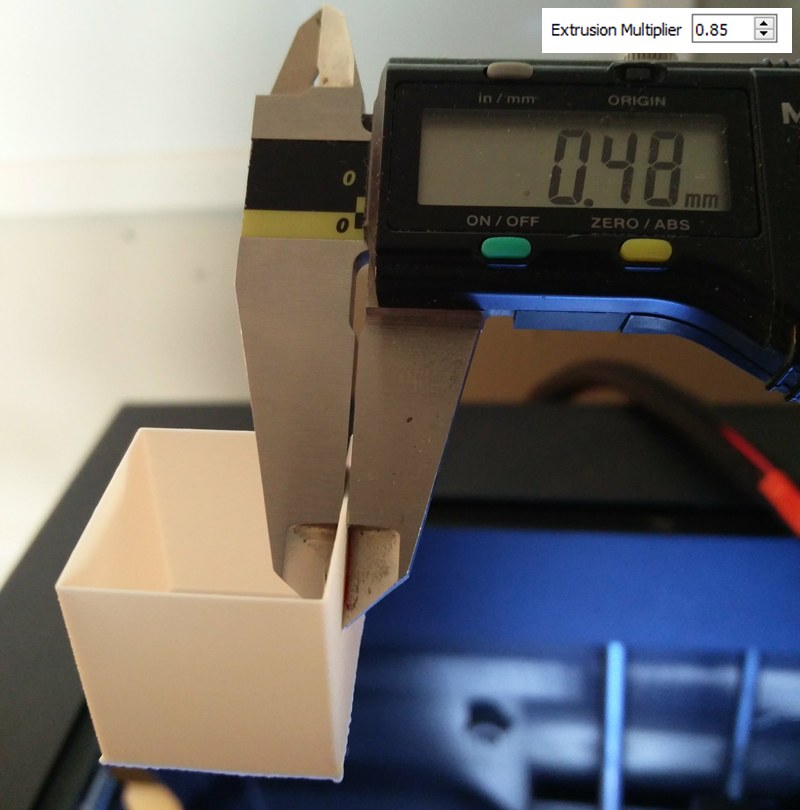
Start with the extrusion multiplier set to 1. The goal will be to measure the single walls on the printed cube to match the extrusion width, which in our case is 0.48mm.
Filament Settings
It’s important to measure the actual diameter of your filament. Not all filament is created equal and this should be checked each time you load a new roll into your machine.

You will need a Caliper to do this, this is a great tool to have for 3D Printing and you will find you use it often.

Now that we know our true filament diameter, enter this into your software.

We are now ready to Slice the model and run the print. Here is a preview of the layers that will print that we have just setup in our software.

Once the print completes, measure the side walls with the caliper and take the average number. We want the side walls to equal the Extrusion Width set in our slicer.
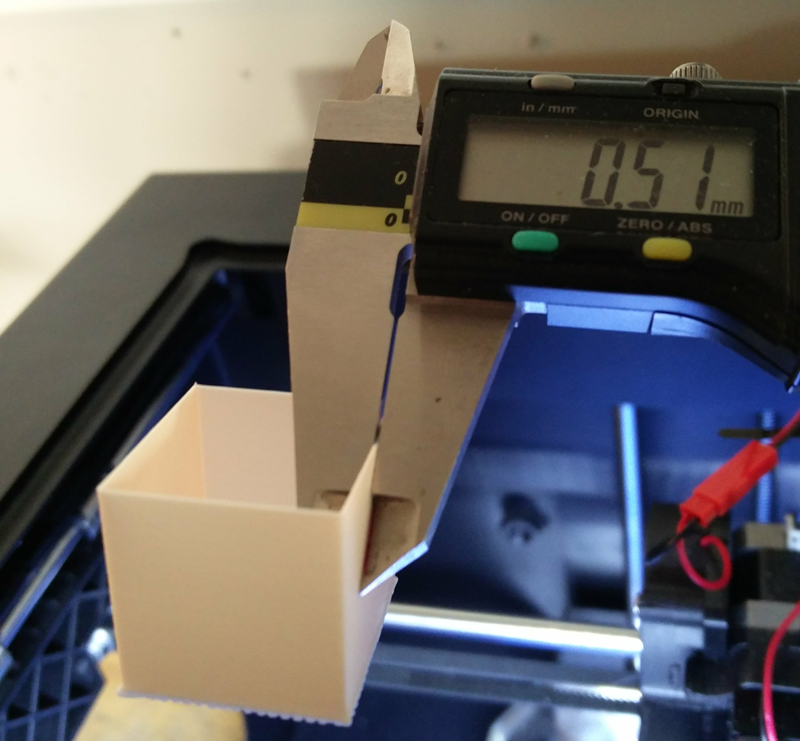
The photo above shows we are extruding over our desired wall thickness. So we need to lower the extrusion multiplier value. Start by reducing it by 0.05mm until you end up with the correct wall thickness.
And you’re all set! You have now Calibrated your 3D Printer’s Extruder and Slicing Profile. We hope this article helped and if you have any comments or questions please leave us a note below!
It’s not
“extruded distance / X = new steps/mm value”
but
“X / extruded distance = new steps/mm value”
@Ervin,
Great catch! Thanks for letting us know!
When i put M501 on the console i dont get nothing of that at all.
i get this:
>>> M501
SENDING:M501
ok 0
Info: 0.000000 0.000000 0.000000 0.000000 0.000000 0.000000 0.000000 0.000000 0.000000
Info:Configuration loaded from EEPROM.
Hi Joao,
Have you checked that EEPROM is enabled in your Firmware settings?
line 1226: #define EEPROM_SETTINGS // Enable for M500 and M501 commands
M501 = Restore (saved) settings
M503 = Report settings <- this is the one that is required for this task
http://marlinfw.org/docs/gcode/M503.html
Thanks for the clarification Brett!!!
What do you mean by “Start by reducing it by 0.05mm until you end up with the correct wall thickness.”
do you mean reduce extrusion multiplier by 5%?
Yeah, they lost me there too.
i just installed a dual driver extruder and when calibrating im getting 1500. seems a bit high to me.
This is the only place where I was able to understand Steps per Unit and how to calibrate it. I appreciate the layman’s term for us newbies.
Glad to hear it helps!
Running the extrusion multiplier down until I get to a .48mm wall thickness is fine until I try the cube with 4 walls. None of the walls are even close to sticking together??
You’ve already been told the corrections to your guide, but yet you haven’t updated the guide?
You should have done that immediately to stop anyone from using the bad info.
We updated the blog to X / extruded distance = new steps/mm value in text and on the form calculator based on Ervin’s comment in 2018. Let us know what you think is incorrect and we’ll have a look. Thanks for the comment.
Hi i saw you have a blog post for esteps calibration. I recently made a youtube video that explains how to do it for both direct drive and bowden setups. Is it possible you can put my video on your blog posts to help people that learn better from watching rather than reading? It might help us both this idea. The channel and video is here:
https://www.youtube.com/channel/UC_mZEKlGeC-TmKC64OdfFHA/videos
https://www.youtube.com/watch?v=x3G3vjXkiVk
also a octoprint tutorial video:
https://www.youtube.com/watch?v=AyJf0ge5enA&t=239s