One of the many challenges you’ll face in your 3D printing journey is removing the finished 3D print from the bed. You may find that your 3D printed model is stuck like anything to the print bed, so what now? How do you remove the 3D print from the bed?
Here are 7 ways to remove a 3D print, and the 4th one will be quite surprising!
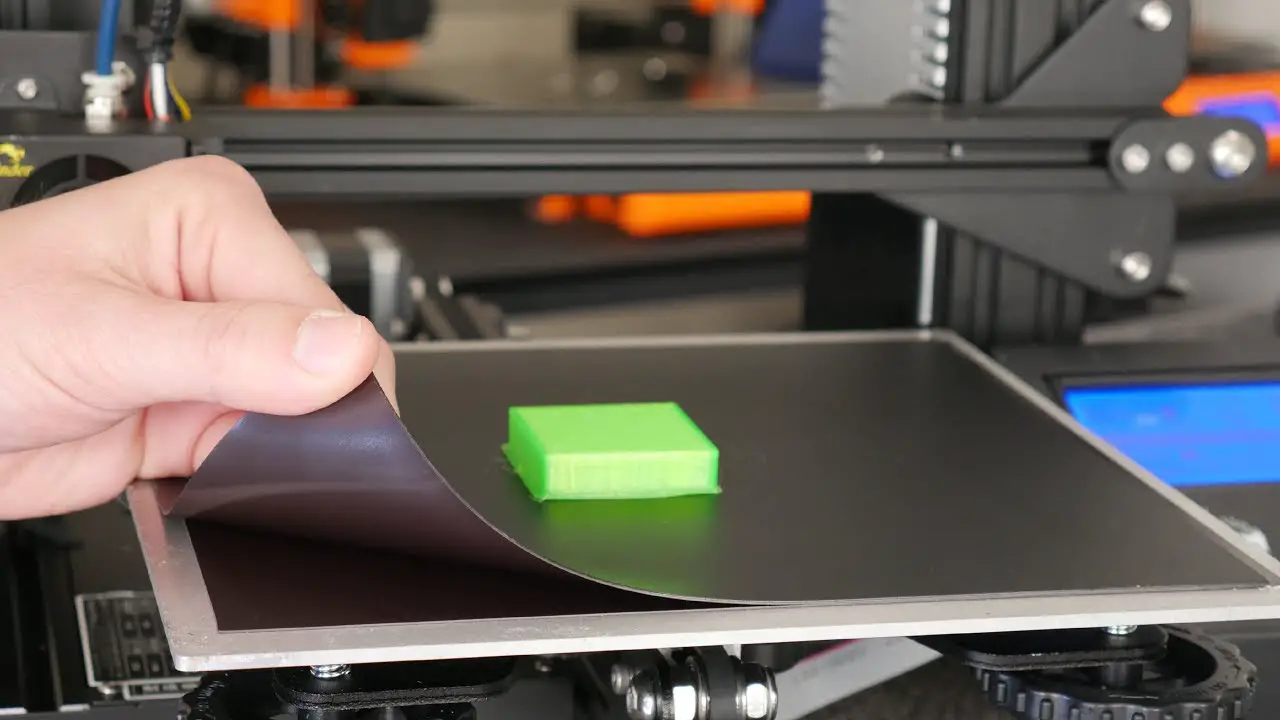
Image credit: Maker’s Muse
7 Ways to remove a 3D print from a bed
1. Yank or knock it off and leverage the moment of the force
The most straightforward way to remove a 3D print is to just yank it off the bed. This usually works for PLA prints done on painter’s tape. If you leveled the bed correctly, you should just be able to snap the 3D print off.
There are a few caveats here:
First off, the taller the print is, the easier it will be to snap it off. You can leverage the moment of the force and the entire print will act like a lever as you apply force to it.
Smaller, flatter prints will be harder to just pull off, but if you have a thumb and forefinger grip to rival Superman, you may be able to do it.
Also, 3D prints that have larger first layers will also be harder to remove than those that have smaller footprints.
Another rather comical but effective way to remove a 3D print with blunt force is to gently tap it with a rubber mallet. You need to be careful if your print is delicate, as you don’t want to end up damaging the print whilst trying to remove it!
2. Set up gcode to knock the print off
An unorthodox but effective way to remove a 3D print from the bed is to add some gcode to the end of your print that raises the gantry by so many mm and moves the print bed so that the gantry collides with the print, knocking it off the bed.
If your prints stick too well, this will not work! You may end up burning out a stepper motor if the print does not give!
3. Use a sharp tool like a paint scraper
This method is the most common way to remove stuck 3D prints. By using a sharp tool like a paint scraper or a razor blade, you can work your way in between the 3D print and the print bed. As soon as you can lift a bit of the print off, the rest will pop off very easily.
It’s just a matter of getting part of the print detached from the bed. Paint scrapers are super effective, and some 3D printers like the Ender 3 even ship with a paint scraper in the box!
There are a couple of ways to do this:
You can either take the paint scraper and stab at a corner of the print, or you can go the more gentle route and try to wiggle it in.
Stabbing at the print is much more effective, but you do risk minor cosmetic damage to the bottom layer of your model.
Trying to wiggle it in works too, but you have to be really careful, as the scraper can slip and you can hurt yourself.
An alternative to using a paint scraper is to use a very thin razor blade. You can print a handle for the blade and use it to get 3D prints off the bed with relative ease.
It goes without saying, but a razor blade is much sharper than a paint scraper, so you need to be doubly careful.
4. Use dental floss
Dental floss is surprisingly effective at removing stubborn 3D prints from the print bed. It makes sense: floss is designed to slip between teeth even if they’re tightly packed together, so you should be able to wiggle dental floss between the model and print bed, too.
You’ll need to use a generous amount of dental floss, so break some off and loop it around a corner or side of your print.
Then grab both ends with your hands and start wiggling it to get in under the 3D printed model.
Remember, you just need to get part of the model off, and the rest should come off quite easily.
5. Utilize temperature differences
Another way to remove a 3D print is to thank your old friend thermodynamics. Since hot objects expand and cold objects contract, you can utilize this principle to get a print off the bed.
This will work even if you print with a heated bed.
You may find that getting a print off of a heated bed is difficult while the bed is hot, so waiting for the bed to cool will cause both the bed and the 3D print to contract.
Since the bed and the model are made of different materials, they will contract at different rates, letting you snap the 3D print off with relative ease.
How long should you wait for a bed to cool before removing a 3D print?
For a very stubborn 3D print, wait for the bed to cool completely before you try and remove it. This will allow for the greatest temperature difference and contraction.
How do you release a 3D print from a glass bed?
The temperature technique works better with glass beds than other materials, because glass is a supercooled liquid and expands and contracts much more than plastic. Simply wait for the glass to cool completely, and try popping the 3D print off. If it still does not come off, use a paint scraper or floss to loosen it.
Be careful when applying any kind of force to a glass print bed. The last thing you want is for the glass to shatter! Using a tough, temperature-resistant glass like borosilicate is a good option.
If room temperature does not solve the issue, you may need to pick up the entire bed/build surface and stick in the fridge or freezer to really cool it down.
6. Use a solvent
If all else fails, you can use a solvent to dissolve part of the print or build surface and get it off the bed. Solvent should be used as a last resort because you’ll most certainly damage your layer of painter’s tape. Even if you did not use tape, you generally don’t want to use liquids near electronic components.
Take some isopropyl alcohol and dab around the edges of the print to let it soak in a little. This should loosen the bond and help the print come off.
If you used glue stick or hair spray, you can use a damp, warm towel to clean up the residue.
7. Use a flexible build plate
The best solution of all is to use a flexible build plate. This is an upgrade that costs money, but it will save you a lot of hassle and heartache in the long run.
Magnetic build plates snap on and off your heated bed, so once the print is complete, you can just pull the magnetic plate off and twist it until the print pops off.
If the adhesion is too strong, you can pop in in the fridge or leave it under an air conditioner to take advantage of the expansion/contraction principle.
Related
How to remove PETG
PETG is notoriously difficult to remove from Buildtak surfaces, so MAKE SURE you re-level the bed before you print PETG. PETG tends to need a slightly lower bed than PLA, so taking care of this step in advance will help you in the long run.
It’s also worth printing on painter’s tape so you can just remove the entire tape layer to dislodge a really stubborn print.
Conclusion: general tips for easily removing prints
In order to prevent extremely stuck 3D prints, it’s worthwhile to perfect your bed leveling. Even a fraction of a millimeter can cause a print to be stuck too strongly to the print bed.
While the business card method works just fine for most prints, printing leveling squares is the best way to really dial in your bed leveling.
Leveling squares are just single layers that print on the four corners and center of your print bed, and they let you visualize where the bed is too close or too far from the nozzle. Then you can make micro adjustments and get your leveling perfect for great prints and easy print removal.