Two. Full. Days. That’s how long it took me to figure out the stupid nuance to format an SD card on a mac when trying to flash the firmware of my Creality Sermoon D1.
Let my pain be your success with this simple guide that’ll get your SD card formatted on a Mac and ready to flash a Creality screen in two minutes.
What’s actually important when formatting an SD card for flashing a creality screen’s firmware?
While you might need to do this for any 3D printer, I’ve experienced it on the Creality Sermoon D1 and Creality CR-6 SE. Here’s what you need to know that was a pain to find online when it comes to flashing an SD card for a Creality screen (such as the Ender 3, CR-6 SE, or Sermoon D1):
- You can’t have any other files on the SD card
- The SD card must be formatted in Fat32 – therefore it must be less than 32GB
- You must use an allocation of 4096 or 2048 (this is what got me)
Online you might find people saying to use the SD Card formatter app for mac.
Don’t use the SD Card formatter app!
there is no way to set the correct allocation and there isn’t a good way I’ve found to determine if the allocation is correct.
How to format an SD card on a mac to prepare for flashing a 3D printer’s screen’s firmware
The easiest way to format your SD card to have it ready for flashing a screen’s firmware is to:
- Place the SD card into your computer
- Open Disk Utility (I use Spotlight search to make this easy, hit COMMAND+space, then type “disk utility” and choose the app that comes up).
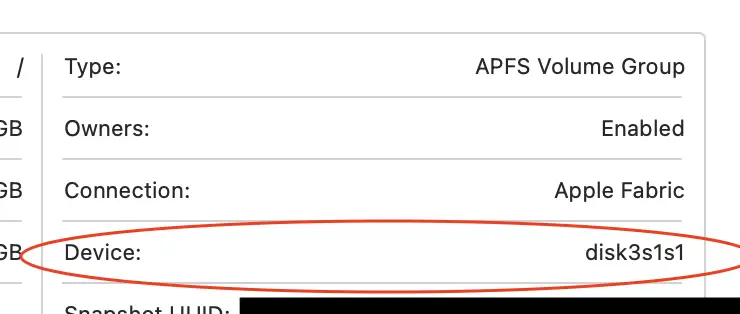
- Note the Volume ID (see below, you’re looking for “Device” – but that’s actually the volume)
- Open the Terminal app (again, Spotlight is great)
- Type the code in the section below, update the two areas, and hit enter.
How to find the Volume ID for an SD Card in the Disk utility app
Open Disk Utility, click the SD card you’re looking to format and look in the bottom right section under “Device”.
Code to format your SD card on a mac to make it ready for flashing 3D printer screen firmware
In the terminal, once you’ve noted your Device ID (it’s really best to only have one SD card so you don’t accidentally nuke your entire hard drive or another drive), copy and paste the below, replacing the bolded sections:
WARNING: This will irreversibly format the drive volume that you list – so get it right. Check twice (or three times) and hit enter once.
sudo newfs_msdos -F 32 -c 8 -v NEW_DISK_NAME VOLUME_IDRemember, replace “NEW_DISK_NAME” with a name you choose and “VOLUME_ID” with the volume found on Disk Utility. Then hit enter.
Note: Your disk ID may change every time you plug/unplug the SD card, so check every time.
So for me, I wanted to name the SD card to “SCREEN” and my volume ID was Disk4s1, therefore I entered:
sudo newfs_msdos -F 32 -c 8 -v SCREEN Disk4s1 (don’t use this – it was specific to mine)
What that code says is:
- “super user do” (sudo), required for most terminal commands that can really mess up your system
- use the newfs_msdos utility (it creates a FAT12, FAT16, or FAT32 format)
- 32 creates a FAT32
I’m still trying to determine the -F, -c, and -v flags and 8.
Anyways, this solved my day or two of fighting to get my Creality Sermoon D1 screen firmware flashed to a firmware that’ll allow me to install a BLTouch.
Good luck!